Results 1 to 3 of 3
  1. #1
    Join Date
    Jan 2008
    Location
    Edmonton, Alberta CA
    Posts
    946
    Downloads
    0
    Uploads
    0

    Using the Pen Tool to create paths

    Using the Pen Tool to Create Paths

    Start with your base drawing as a template. Unlock the layer by double clicking on the lock. In the dialogue box that pops up, reduce your opacity to about 50%. Now add a second layer. This is the one we'll start working on. Make sure you lock the first layer so you don't in******ently start working on that one. Begin by selecting the pen tool. On the tool bar, select or verify the following settings:

    Name:  pen settings.gif
Views: 2534
Size:  24.1 KB

    1. Select Paths option
    2. Pen Tool selected
    3. Rubber Band off
    4. Select Add to Path Area option

    Zoom in on your image first so you can see what you are working on. With the opacity reduced on the bottom layer it?s easier to see your lines as you create them. Here I have already created the second layer and since it?s flagged blue I know I?m working on that layer.

    Name:  pen1.jpg
Views: 2623
Size:  41.9 KB

    Starting at the lower right of the spinner I make my first anchor point. For the second I?ll use the lower tip of the spinner. When working with curves, the fewer the anchor points you have, the smoother your work will be. Click on the second point and you will see Bezier handles appear. Using the one in the direction you are traveling (in this case the one on the left) you can control the shape of the curve. By grabbing the end of the Bezier, if I pull downwards the curve will billow inwards. We don?t want that, so I pull upwards. If the Bezier ?barbell? is short, the most dramatic change in the curve will happen in the line closest to the anchor point. The longer you stretch the Bezier, the further away from the anchor point the change will occur. By pushing and pulling on the Bezier you can see what the line is doing. DO NOT RELEASE THE MOUSE BUTTON DURING THIS ADJUSTMENT! If you do, the curve will lock into place and if it?s wrong you?ll have to back up and do it again. Release the mouse button only when you are satisfied that the line is following the correct shape. OK?onto the next anchor point at the top front of the spinner.

    Name:  pen2.gif
Views: 2401
Size:  134.0 KB

    Oops! What happened there? The program assumes that the line is going to carry on as a curve and so at first it takes off in the direction the Bezier was pointing before realizing that the anchor point is in a different spot, so it arcs back to connect with it. Sometimes you can use this to your advantage, but in our case it?s not what we want. Better back up (ctrl+Z is the shortcut for that).

    Name:  pen3.gif
Views: 2403
Size:  66.0 KB

    First of all, you have to tell the program that it has reached a terminus point or has an angle change ahead. Press and hold down the Alt key and click on the last anchor point. The Bezier disappears.

    Name:  pen4 alt-click.gif
Views: 2391
Size:  77.4 KB

    Now you can make your third anchor point. This only needs to be done when you are switching from a curved line to a straight line. There is also a little trick to this next line. If the line you are creating is either a 45, 90 or 180 degree line and you want to make SURE it is, hold down the alt key again and make your next anchor point. Perfect every time!

    Name:  pen5 alt-click.gif
Views: 2383
Size:  79.3 KB

    I?m going to fool you again! The next line is a curve, but you don?t need to do an alt/click thingie. The program assumes that you are going to make another straight line which could be in ANY direction, so it?s not following a pre-determined arc and will simply connect the dots with a straight line. It?s only when you click and drag on that next anchor point that it suddenly realizes that it has to make a curve. When I click and drag, notice where the rear half of the Bezier barbell is?right about the center of the line, so that?s where the greatest amount of curve appears. If this was a straight line, the Bezier would line up with it perfectly. I?ve bent it downwards slightly, so the line bows outward slightly just like we want it to. You?ll see how more radical curves are affected by the Bezier when I start to work on the cowl. Just remember that the line will bend in the opposite direction that you are pulling on.

    Name:  pen6 next curve.gif
Views: 2383
Size:  75.4 KB

    Bet you forgot the alt/click thing didn?t you? Remember that you are transitioning from a curved line to a straight one, so you MUST do the alt/click thing. We?re just about to close the path here. How can I tell? Look at the pen icon?it has a little ?o? next to it. If I hold down the alt key and click on that, I?ll get a perfectly vertical line even if the final anchor point is slightly out of whack.

    Name:  pen7 corner point.gif
Views: 2379
Size:  88.9 KB

    There?s your completed spinner?and what a work of art it is! Wasn?t that easy? You?re feeling ambitious now and want to take on the cowl, right? OK?.here we go?..

    Name:  pen8 closing path.gif
Views: 2381
Size:  77.2 KB

    Start a new layer and lock the spinner layer so that you don?t screw that up with some bone-headed maneuver. Call the new layer Cowl?.just to be different. Go ahead and laugh! When you have 30 or 40 layers stacked up, YOU try to find the right one to work on without proper naming conventions! Actually, there?s an easy way to tell, but I?ll save that for later. OK, let?s get started on this puppy! I?ve already got the first several anchors in place (sorry, I started while you were off getting a beer) and now we are at the MG blister. Look how long the Bezier is for such a short line and where the tail of the Bezier is. That is where the most curvature occurs while it?s rather gentle towards the path terminus. Had to show you the difference. OK, alt/click on the last anchor and we?re ready for the trek downwards.

    Name:  pen10 cowl bump.gif
Views: 2382
Size:  121.6 KB

    Things are rather simple until we get to the underside of the fuselage and then it gets trickier. There are two curves back to back that are both headed in opposite directions, so I put an anchor point where one curve ends and the other begins and in that way I can control both curves individually. Since the intake front has a bit of a radical curve to it, I?ll deal with that individually as well.
    Notice anything different? Where?s the pen icon? It?s still there?right near the front of the Bezier. See the crosshairs? If you find that any Photoshop icon is getting in the way of accuracy, you can switch to a pinpoint mode by putting the cap locks on. Just don?t forget to take them off afterwards. OK lads?.onwards and upwards!!!

    Name:  pen11 intake.gif
Views: 2374
Size:  110.8 KB


    Actually I had to drop two anchor points at the front of the chin radiator scoop because the leg I?m on now pretty much counts as a corner point?.so alt/shift and you?re off again! Actually, the best way to handle the leg I?m on now is to close the path with the last arc, save it and start a new path for the nose cutout. That way the final curve will be continuous even if I cut a bit of it out.

    Name:  pen12 lower cowl.gif
Views: 2364
Size:  111.5 KB

    All finished! I turned off the bottom layer so the paths could be viewed without all the clutter. Everything is looking good for you to move on to the next stage. I?ll let you do that because the more practice you get at this the better you?ll become. It?s a bit confusing at first, but once you catch on things like this will be a snap to do!

    Name:  pen13 complete cowl.gif
Views: 2364
Size:  10.2 KB

    Anchor points can be moved immediately after you place them using the arrow keys. If you have completed a path and feel it needs adjustment, you can move the anchor points individually or as a group. Use the Direct Selection Tool (that?s the arrow icon at the top) to reactivate the path by clicking anywhere on the line. You can now drag individual anchor points to adjust the line or select all the anchor points in a path to edit the whole path.

    Creating a closed path differs from creating an open path in the way that you end the path. To end an open path, just click on the pen tool in the tool box. I?ve already shown you how to create a closed path in both examples above. Any path you start after closing a path will be a new one. SAVE FREQUENTLY or risk loosing your hard work! If you deselect an existing work path and then start drawing again, a new work path will replace the original one unless you have saved it.

    With all that being said, Photoshop is NOT a drawing program, but an image editing program. It?s true you can create things from scratch with it, but it?s a very cumbersome way to work. Those of you with the CS program have the complete Adobe Suite (that?s what CS stands for!) which includes Illustrator (DROOL!!!!!). All of your image creation should be done there FIRST. Once it?s blocked in, drag it into Photoshop and detail the daylights out of it there. I notice someone was trying to figure out how to do outline numerals. In Photoshop this is a bit awkward to do because it wasn?t really designed for that purpose, but Illustrator was and you?d be done in 3 clicks and still have full editability!

    That?s it for this time Lads! Have fun practicing. Oh, and next time bring a beer for me wouldja!
    Attached Images Attached Images  
    Last edited by Serval; 21st August 2008 at 18:40.
  2. #2

    Re: Using the Pen Tool

    Damn I thought CS stood for Creative Suite, just goes to show, you can teach an old dawg new tricks. That done with, this is an excellent tut Otterkins2 thanks for taking the time to write it up and make the screens. Do you have plans to make any more?
  3. #3
    Join Date
    Jan 2008
    Location
    Edmonton, Alberta CA
    Posts
    946
    Downloads
    0
    Uploads
    0

    Re: Using the Pen Tool

    Jester, yer such a smart alec! 
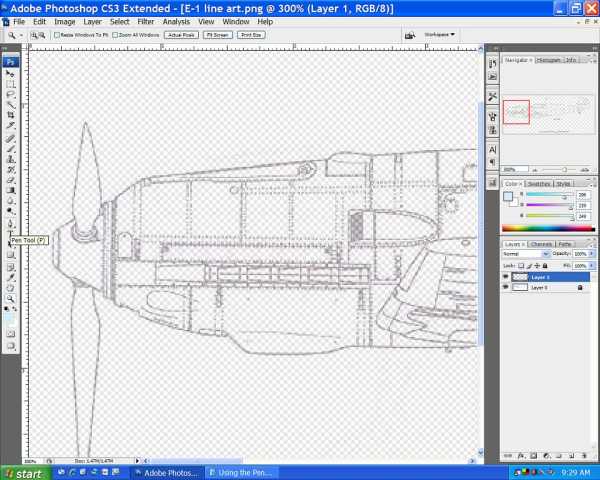
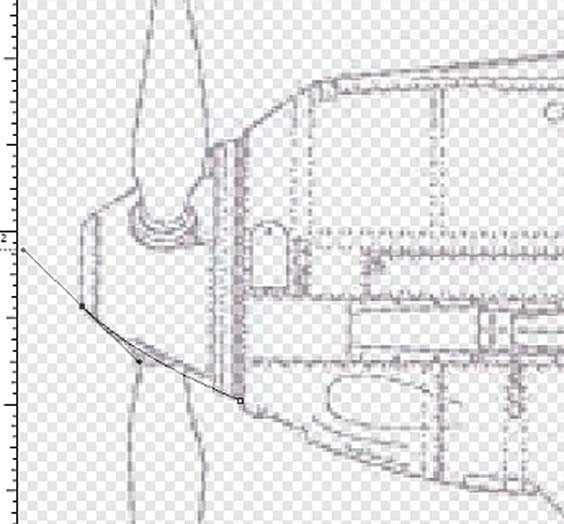
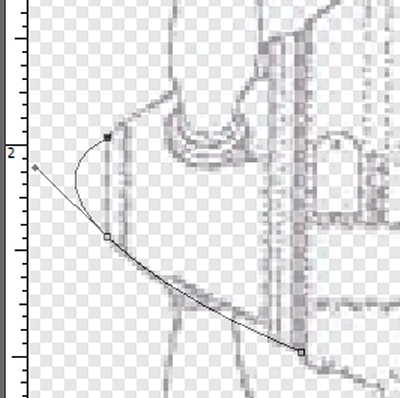
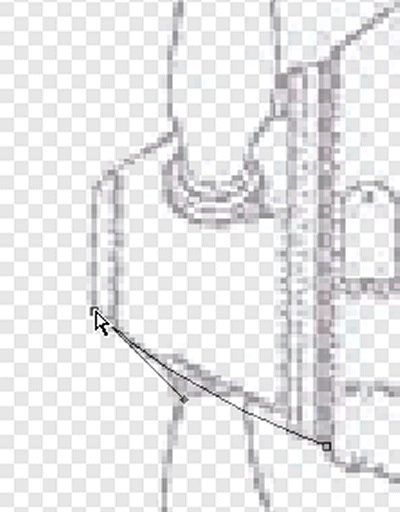
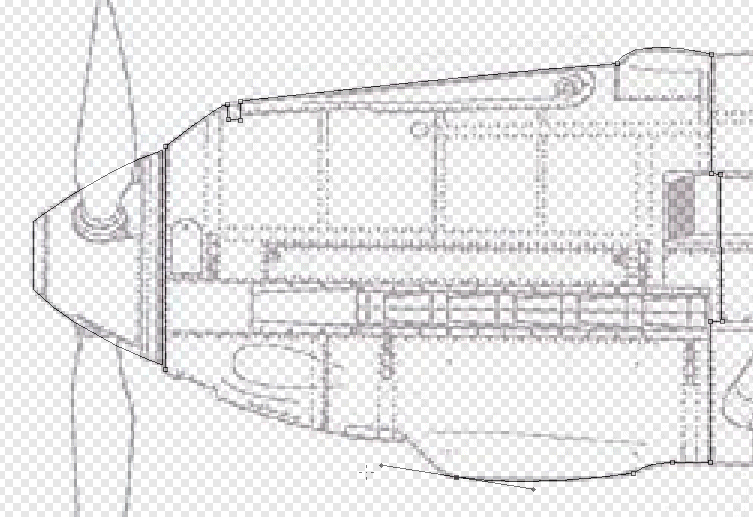
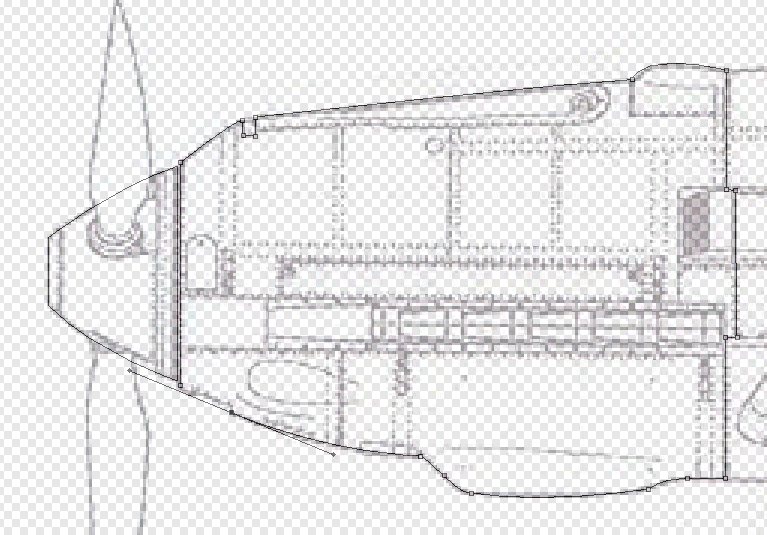
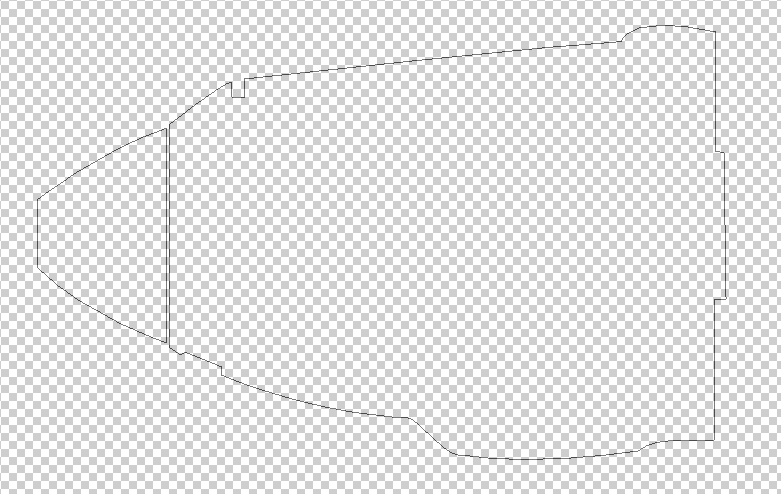
Yes I plan to do more but it will be mixed in with Illustrator "how to's" if that's allowed. I notice there are none here yet and I can't imagine trying to do profiles and skins from scratch without it. For Illustrations it's da king! However, to really make it look photo realistic you have to use Photoshop for outstanding results. The two together make an unbeatable team! I'll also be putting the tutes into PDF format for those that want to save them for later reference. I just have to figure out where everything goes on this enormous and awesome site! I was also thinking of putting together a batch of tactical markings for people to download and use, but I don't know the best format for that. Not to many can read AI files and editability suffers if they are put into .gif or.jpg format. Any suggestions....nice ones that is?
    Last edited by Otterkins2; 23rd January 2008 at 04:55.

Similar Threads

  1. Using the Panel Finder Tool
    By adlabs6 in forum General Tutorials
    Replies: 2
    Last Post: 4th October 2010, 05:25
  2. A fader tool for PSP 9??
    By commercialcobb in forum Paintshop Pro
    Replies: 2
    Last Post: 23rd April 2007, 08:52
  3. Paths
    By 1.JaVA_Platypus in forum Photoshop
    Replies: 4
    Last Post: 20th March 2007, 02:12
  4. Directional Blur Tool Available?
    By pstrany in forum Photoshop
    Replies: 5
    Last Post: 13th February 2007, 15:55
  5. Sharpen your brush tool fellas...
    By Aero_Shodanjo in forum IL-2 Series: FB / PF / 1946
    Replies: 2
    Last Post: 26th August 2005, 20:34

Posting Permissions

  • You may not post new threads
  • You may not post replies
  • You may not post attachments
  • You may not edit your posts
  •