
-
2nd October 2006, 22:10
#1
Color Depth and Palette Conversion for Texture Artists
Overview
In this article, I'll try to explain the basic concepts behind color depth and what happens to the textures we make when they are converted between color depths as we move from our graphics painting software to the simulator. In order to give a better understanding of what is actually going on during this conversion process, I'll start with some foundation in RGB color and how it works inside our computers. I'll try to keep this written in plain language, and hopefully it'll be not only understandable, but also a pleasant read.
RGB Color Theory
The basis of all the color graphics we see on our monitors is the RGB color theory. The RGB color system defines red, green, and blue (referred to as channels) as a percentage of intensity from none (black) to full intensity. We can visualize this with the graphic below, where each band of color forms a gradient from black to it's brightest intensity.

The RGB color model allows the intensities of these three colors to be mixed in an additive way, so that when full intensity red, green, and blue are overlayed we get white. When we try this in our graphics program, we can see this result using layer blending modes. Making a three layer image, paint pure red (255,0,0), green (0,255,0), and blue (0,0,255) onto one layer each. Now set the top two layers' blending modes to "lighten" (for Adobe Photoshop) and see what you get. Notice below that the three layers are only red, green, and blue. Where they all overlap white is show, where only two layers overlap, the additives for those layers are shown.
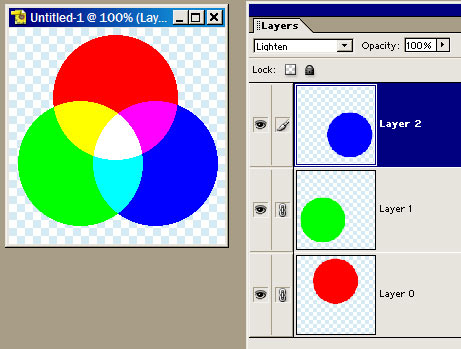
So with the knowledge we've attained so far, we can take each of red, green, and blue from black (RGB each at 0% intensity) all the way to white (with RGB all at 100% intensity, additive to one another). By varying the intensity of any one of the RGB channels between black and 100% and then adding it to the other two channels, we can create what amounts to almost any color our PC monitors can display.
RGB Color in Computing
For a color to be represented on our computers, it needs to be encoded into a digital format flexible enough to allow all the possible colors to be shown. This is done using an 8-bit byte as the basic building block. Lets take a look at how bits and bytes work.
A bit is the smallest piece of data in a computer. This 'bit' will only have two states of existance, ON or OFF, which are represented often by the number 1 (for on) and 0 (for off). This representation is called binary, which means that two states are used to represent all data. But by itself, a single bit can't tell us more detailed things about our color data. To do this, bits are strung together into groups of eight, which are collectively called 'bytes'. So, eight bits in a byte... easy to remember.
If we consider that a byte has eight separate 'bit' switches that can either be on of off individually, we can express exactly 256 different combinations of on-off patterns. If we apply this to a color channel, we can divide red into 256 different intensities from black to pure color with 254 shade variations in between, and express each tiny change in color as a different bit pattern inside a byte. Since that byte can only represent one of the three channels our additive color system needs, we'll add two more bytes, one each for the other two channels. So to display a single RGB color spot we'll need three bytes of data, each with eight bits representing the intensity of red, green, and blue separately. With this tiny three byte file, we can show 16,777,216 different colors as calculated here:
(256 red)x(256 green)x(256 blue)=16,777,216 colors
Since each three byte block represents just a single spot of color, such as a single pixel on our monitors, we can calculate how many bytes of data will be needed for a full image. Multiply the height and width dimensions of an image in pixels to find the total number of pixels. Finally, since each pixel is three bytes, multiply the total pixels by three.
(1024 pixels high)x(1024 pixels wide)x(3 bytes per pixel)=3,145,728 bytes or 3 Megabytes.
Color Depth
Now that we've covered how color information is handled in our computers, we can discuss color depth. The idea behind color depth is that if we can reduce the number of bytes needed per pixel (remember, three bytes per pixel above) we can save space in memory or harddrive. This is especially important for PC simulators, where many image textures will be loaded into memory at one time.
Suppose a sim developer wants to load 10 textures into memory at once, and each texture is 1024x1024 pixels for good detail. At three bytes per pixel, we know that texture will be 3MB, so 10 of them total 30MB of textures in memory. If the developer wants to reduce this memory useage (to speed up loading or make more memory available for other simulation processes) he has two choices. Since the memory useage of the texture is determined by (total pixels)x(bytes per pixel) either one of thoes two parts can be reduced and the texture will use less memory. Lets consider reducing the total pixels in the texture by making the file 512x512 pixels.
(512 pixels high)x(512 pixels wide)x(3 bytes per pixel)=786,432 bytes or about 768k
That's a savings of 75%! But of course... the textures are now less detailed.
What if instead of reducing the total pixels, the bytes per pixel could be reduced instead? This is the concept behind color depth. Reducing the number of bits of data required to represent the colors of an image, while keeping the image resolution high.
24-bit Color
In the examples given above, we've been allowing 3 bytes per pixel for color information. Translated into bits we get (3 bytes)x(8 bits each)=24 bits. This is what is commonly known in computer graphics talk as "24-bit color", as 24 bits of data represent each pixel's color, 8 bits each for red, green, and blue. This high quality format draws from a maximum color palette of 16,777,216 colors which is more than enough for most computing graphics tasks.
32-bit Color
Here I'll make mention of 32-bit color and what it consists of. Just like a 24-bit color image, there are 8 bits each for red, green, and blue. The additional 8 bits of data are either left ignored, or are used for an alpha channel. An alpha channel is a monochromatic 'layer' of data that is not displayed when a 32-bit image is viewed as a picture. The data in the alpha channel comes into use mostly in games and simulations when a certain area of a texture should be reflective or rendered invisible. By painting on the alpha layer (which being 8 bit can support 256 levels of shading) a texture artist can control reflectance or transparency when they are available in a game or sim (not all support alpha channels). A common example of this the reflectance mapping in FS2004.
In terms of actual colors or quality though, remember that a 32-bit image has identical color data as a 24-bit image. Most of the graphics software packages save in layered formats at 32-bit color in order to save any user created alpha channel data.
8-bit Color
For many computer games and simulations, the reduction in bytes per pixel to save memory space comes in the form of 8-bit color. For most 8-bit images, instead of dividing each RGB color channel into 256 parts (as in 24-bit color), the entire color palette for all channels combined must be represented in just 8 bits per pixel. This presents some specific problems we'll take a look at now.
Applying the 24-bit method of dividing a channel into 256 segments represented by 8-bits of data doesn't give good results for an 8-bit palette. Since we've got to work inside 8 bits total per pixel, lets imagine dividing those 8 bits into three parts of 2 bits each for red, blue, and green. The total number of color combinations for each channel is reduced to just 4, and the total three channel palette is reduced to 64 colors! Look how the RGB gradient is destroyed by this...

The solution is to use a pre-defined palette. Since the available 8-bits can show 256 different individual results as a whole (where as divided per channel it shows much less), we can create a defined palette of 256 colors that will appear in our image and give each color a specific numbered name. Now each texture pixel will be represented not by 8 bits of color data, but instead by an 8 bit name for a color on the palette.
The palette is often imbedded into the image file, and can either follow one of several preset palette designs, or the palette can be optimized for the specific colors in the image to give better results. Here is the RGB gradient represented by 256 colors...

You'll notice some banding has appeared near the darker regions, but this can be solved during the process of color depth conversion through the use of dither patterns. Overall the result is quite good enough to work with.
Color Depth Conversion
When your final repaint is ready for conversion to 8-bit color from the 32-bit layered source file, The quality of results will depend on several things. Options to consider include the palette type and dithering.
Firstly, the choice of palette should be set to an 'optimized' type to generate a color palette that closely fits the artwork. Using the 'web safe' or 'system' palettes will provide obviously worse results since thery are designed to cover an average range of colors, where as a texture often has a much narrower range of main colors. Sometimes even when the best optimizations are made for a palette, still there may not be enough available colors to properly represent a gradient area. The result is what is known as 'banding', where obvious bands of color appear in areas of subtle gradient. Here is a gradient showing banding.

To minimize the banding problem, we can use dither patterns. A dither pattern is a process by which a few colors are progressively scattered into one another to create the appearance of a smoother gradient. Dither pattern come in several types. Dithering called 'pattern' is where the dither is uniformly applied in a checker board pattern. The 'diffusion' type dither randomizes the patter along pixel features in the artwork. 'Noise' dither randomizes the pattern more uniformly over the artwork than does 'diffusion'. The 'diffusion' and 'noise' are best choices. Here is the same gradient above shown with dithering applied to smooth the banding.

Notes about BRIGHT
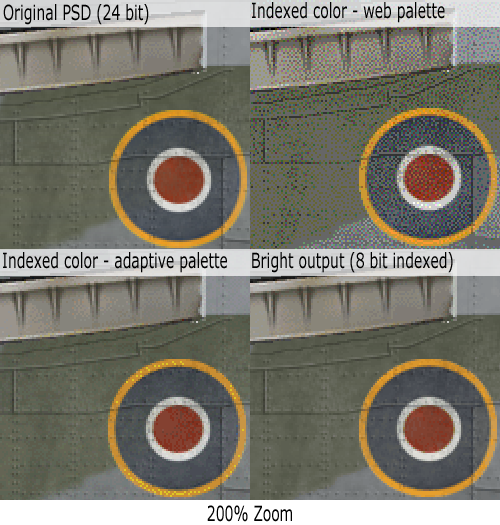
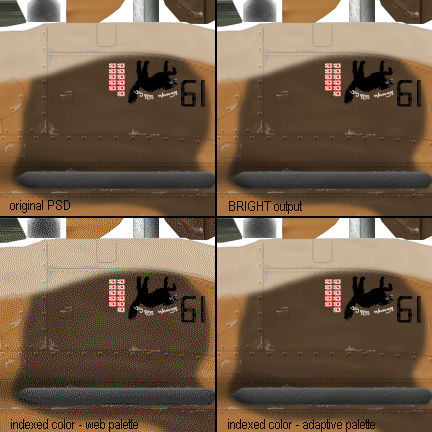
There are often questions about the program called BRIGHT which does color depth conversion independantly from the tools built into graphics software, either as a plugin or standalone. The BRIGHT program appears to make better judgments during selecting colors when creating the optimized 8-bit palette, though banding can still occur in images with very wide spectrum of colors. BRIGHT also seems to do a very good job on dither patters, which makes even better use of the good palette building. Doing some comparisions with your own graphics software converter will let you decide for yourself if BRIGHT helps in your work.
Below are comparisions of the different coversion types on the same area of a skin. These images are 24bit png format to preserve detail.
Hopefully this article has clarified the topics of color depth and palette conversion as it pertains to texture artists. Aside from technical understanding on the subject, once the best process for conversion is worked out by an artist it's mostly point and click from there to testing your paint work in sim.
-adlabs6
Last edited by Serval; 13th December 2015 at 20:36.
 Posting Permissions
- You may not post new threads
- You may not post replies
- You may not post attachments
- You may not edit your posts
-
Forum Rules
 Forum Guy


 Reply With Quote