
-
3rd October 2006, 21:39
#1
Basic Skin Making and Bare Metal Effects for IL2-FB
Preface
This tutorial covers creating bare metal effects, making weathering effects, as well as the basis of skinning. Some parts will be more useful to some people than others.
Skinning a plane in IL2 Forgotten Battles can be daunting. Not only in terms of skill and know how, but also in hardware and software tools required. I hope this tutorial can be a waypoint on both fronts. The most important part of a first successful skin is just sticking to the project until your happy.
I'd like to start by saying that tools should not be focused on to strongly. Most popular graphics packages are more than capable of fine work. Many are available for under $100 US, and there are always bundled packages, where hardware includes a piece of software that is usable for skinning. Photoshop Element 2.0 and Paint Shop Pro 7 are good, popular examples. I've used a dozen similar programs in the past decade that were nearly as good, but cost less or were free, like the GIMP. On the hardware front, a mouse is quite usable to paint a skin. Some of the more delicate details will require careful overlapping of strokes to get nice feathers, but its not as easy as using a pressure sensitive pen tablet. A few models are around $100, with sizes generally about 4x5 inches for the working area. More expensive models have drawing areas from 9x12 inches and up. Smaller pads are fine for skinning.
For this tutorial I used a Wacom 4x5 (about $100) inch pressure tablet and pen, and Photoshop LE, which came in the box with the tablet free. I've used it for about a year, and have yet to be let down.
The skills involved in painting a skin vary with each artist. Be meticulous, or relaxed. Its your call. I tend to work fast and a bit sloppy, cleaning my mistakes as I go. If I can cut a corner without sacrificing the intended project quality, I'll do it. A project is generally finished after about an hour of work. That's how this tutorial is written. I hope to show you how to get an effect using the minimum steps required. I'm aware that there are always faster and easier methods for anything I'll show here. But old habits are hard to break, and my relearning might take longer than making the skin!
About void files and templates
Before you begin skinning, you'll need either a void file (from the Forgotten Battles install) or a pre-made template. This tutorial will work with either, adjusting for what you have. I haven't used a template to make a skin, so I can't comment to much on them. If you like them and they work for you then use them. If you don't have (or there aren't) templates for the plane you want to skin, it's no harder really.
Void files from the Forgotten Battles in stall are used for getting the details onto the paint surface you make. Most of these voids are 1024x1024 pixels in size, and have a white or grey background. The biggest issue with voids is the difficulty in determining where each part of the plane is in the image area. Many are quite easy if you have no reference, others are quite broken up around the image area, making for more testing. The easiest way to figure out where the parts of the plane are is to just look at another skin for the same plane. Whether found in the folder with the void or on the web, you can get along way by studying the work of other skinners. Always work from a copy of the original void file!
About plug-in filters
Using a plug in filter to get an effect is fast and easy. It's just not very flexible. The only filter you need to do this project is "Remove White". The version I use was made by Mr. McLaren, and is available at :
http://pluginspt.pluginshost.com/FreePlug/mark.html
This one filter makes even the less powerful software titles much easier to work with. Why? Well, the more costly programs allow alpha channels (white transparency) for layers, while the cheaper ones I've used don't. With Remove White, you get the same effect as an alpha channel, with couple of clicks. Remove White requires a special step for skinning, though. Since the filter takes all white out of the image area, only lines on nothing remain. Some of the solid areas of the void loose density as well. To get the image useable and still transparent, you must place a white backing layer underneath the void layer. You can paint on the white backing layer, or on layers above it, just remember to have a white layer in some form on the bottom to keep things looking right.
Lets get to work
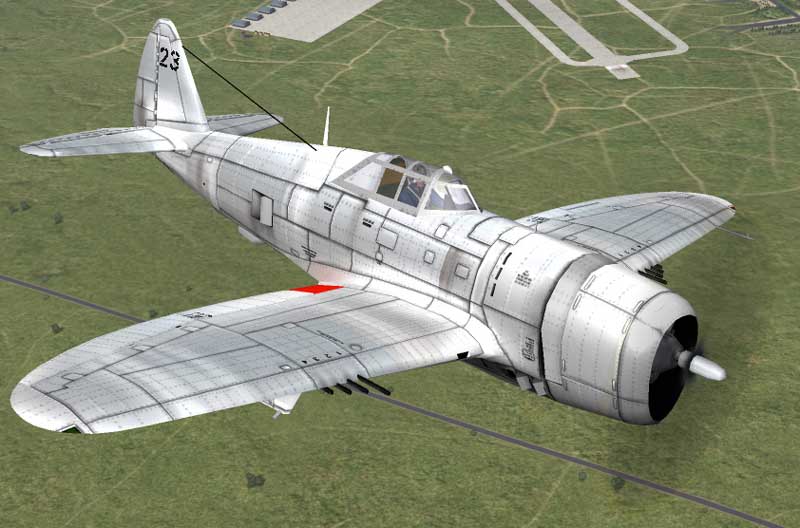
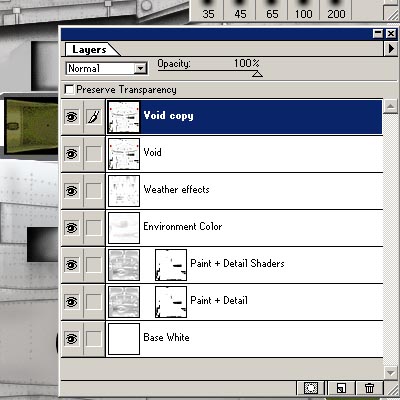
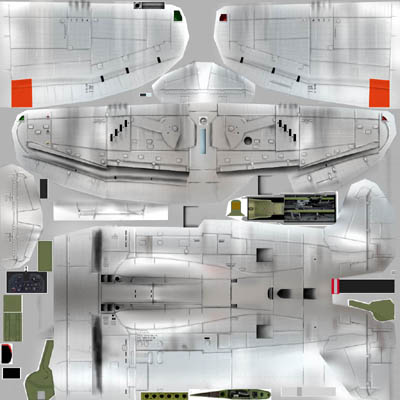
Open your graphics software and open a copy of a void .bmp file. I'm making the bare metal P-47 Razorback shown above. Before any layers can be created, you'll have to convert the void to RGB color. In my Photoshop LE, this is found at [ Image : Mode : RGB color ]. Now you can name and arrange the layers we'll use for the skin. The layer arrangement I use to start is pictured here.
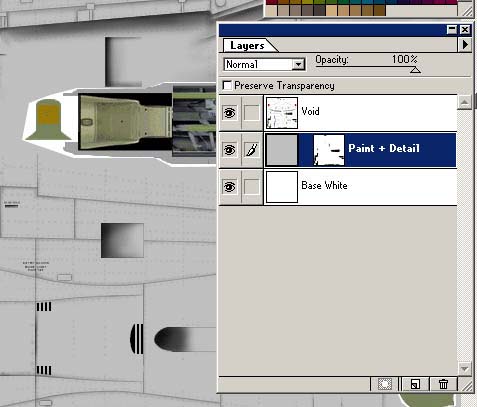
To get to this point, you'll need to:
* Convert the void to RGB color.
* Use the Remove White filter on the void. (you need to download and install it first)
* Rename the void from 'Background' to 'Void'. (otherwise no layer can be behind it)
* Add a layer named Base White. (as mentioned above)
* Add a layer named Paint + Detail.
* Drag the Void layer to the top of the stack.
* Drag the Base White layer to the bottom.
You'll notice in the photo that the Paint + Detail layer has two icons. The second icon is a layer mask, that shields the parts of the Void layer from changing tone as color is applied to layers beneath. To add a layer mask, I select all the areas of the Void layer that I don't want to be modified in the final skin. I use the shift key to select more than one area at a time, until all the desired parts are selected. Now invert the selected areas with the command [ Select : Inverse ]. Then I press the first left most button at the bottom of the Layers tab shown above. In other programs, it may be slightly different. Done! Now I can paint freely on the Paint + Detail layer and not affect the masked areas. To make a bare metal look, I filled the Paint + Detail layer with a medium grey. The skin now looks like this...
Shading
Now we'll move to shading the flat grey paint behind the void, to give some basic dimension and depth to the plane. There's a couple of ways to do this part of the project. The most common is to add a new transparent layer above the grey layer, and use the airbrush tool to add highlights and shadows. You can also use the airbrush directly on the Paint + Detail layer. Some designs are best worked on by placing each section of the plane on a separate layer (upper wings, lower wings, fuselage, etc.). Let the design of the skin determine which method to use. If the skin has several colors then using separate layers for each color/plane part is best. For monochrome colors, working on one just one layer is easier.
To place a part of the plane on its own layer, just add a new layer, name it, and select the area you want to paint with the Lasso or Marquee tools. Then paint on the new layer. Do this for each part you wish to be separate. You can also add a layer mask the same way mentioned above to each of your parts layers. This can be a big time savings, and prevents the paint from one part overflowing to others. As a note on layers, take your time to name each layer for what it is. If you are going to place each part of the plane on a separate layer, your layer stack can get messy fast if you don't take care to be neat with it.
Since I'm doing a bare metal effect, I'll use just the one layer in this tutorial. Doing this involves some risk, since any mistakes that aren't undoable are now stuck on your only paint layer! If your software allows multiple undo's then you're lucky and its not so bad. I don't have that luxury, so I sit with my right hand (I'm a lefty) on the "Control Z" keys on the keyboard. After each stroke with the pen I check to see if all is well, control Z and retry if not, I move on if yes.
For this metal skin, I'll use the Dodge and Burn tools to shade the grey in the Paint + Detail layer. Use a light pressure, and use a large brush for more subtle shading. I made a custom 200 pixel feathered brush to get a very soft effect. I worked like this:
* Select area to be shaded with Polygonal Lasso tool.
* Dodge tool set for 'highlights', use large brushes, light pressure, to shade in large patches. (don't get detailed yet! no brush smaller than 35 pixels!)
* Burn tool the same settings as Dodge for shadows.
* Move to next area repeating the above for each panel. (I didn't save the mask for each part. I just reselect again with the Lasso)
This is my result...
I know it looks like a giant leap from the flat grey, but its nothing more than dodge and burn with brushes sized 35 to 200 pixels. The detail the Void layer adds to the appearance of extra work being done. This is what the Paint + Detail layer looks like with the Void layer hidden. Always amazing how simplistic it looks alone.
Metal reflectivity effects
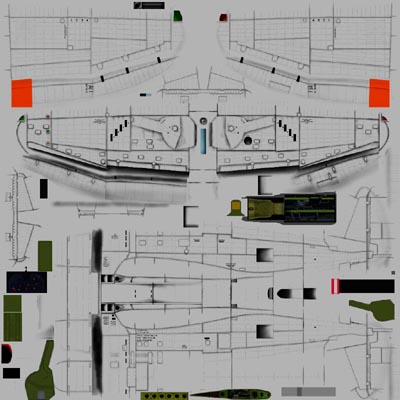
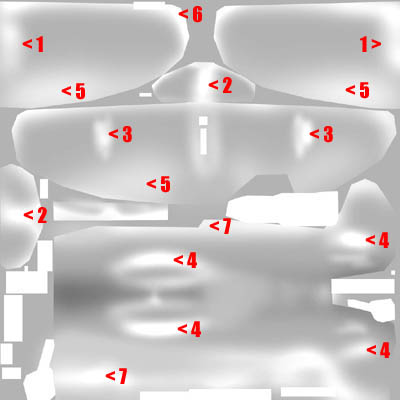
Now for the details on the marks I made on the skin and why. Since this skin represents bare metal, the reflectivity of the material must be considered. Making a grey color and hoping for a shiny metal will only look like a grey plane! If the metal is shiny, then it has several properties that must be simulated. Glare, mirroring, and environmental reflections are all a part of the surface we see, yet these are dynamic components of the surface, changing with light and angle. In the numbered picture above, each number points to an area that is explained below.
* 1> These areas are lightened to simulate light reflecting from the fuselage.
* 2> These areas are lightened to simulate light reflecting from the tail and fuselage.
* 3> This simulates light reflectivity/glare from the shiny bomb racks that are centered in the white spots on the model.
* 4> This simulates mirroring, showing the wing's reflection in the fuselage and tail. (This is amazingly real to my eye on the model)
* 5> Broad flat lightening to show a shallow, randomly reflecting incline.
* 6> More intense lightening is used at the sharper edges, since there's a tighter radius of reflecting here. (Edges are always brightest)
* 7> Along the top of the fuselage and tail, slight lightening is used, with more intensity near the very top of the plane.
Try to imagine how lighted reflective objects behave. Like when you place your hand in near a white wall in the bright sun, theres nearly a reflection on the non-shiny wall. Thats the reason behind the highlights at numbers 1, 2, 3, and 4 in the skin. Look around for examples of this and try to recreate it in your skins. I always take a camera with me when I'm out (now a Minolta Dimage S414). Take photos of things that are useful for visualizing these effects. Only by seeing and studying how this happens in the real world can you simulate it well.
You should be careful when highlighting a skin. The Forgotten Battles game engine has certain limits that it uses when determining a glare on a surface. Once a color reaches a certain 'light point' it will be turned to pure white when there's glare on the model. In general, I find its better to have subtle tones leading to a narrow highlight area. This way, as little of the paint as possible is lost in glare. Notice that at numbers 4 in the photo, the shade quickly goes pure white, since I wanted the game engine to glare this 'simulated reflection' area earlier than the rest of the fuselage. Remember this when placing and sizing your highlights.
Testing the skin
At this stage, Its smart to check the skin in game to see if things are going well. Any errors are easiest to fix at this early stage. To check the skin in game, save a copy of the skin as a .bmp file, then open that .bmp file, reduce the color depth to indexed using the command [ Image : Mode : Indexed Color ]. I use these settings for Indexed Color conversions  :
:
* Palette -> Adaptive
* Color Depth -> 8 bits/pixel
* Colors -> 256
* Dither -> Diffusion.
Save and move the .bmp file to the proper directory of Forgotten Battles, and load the game's Quick Mission Builder. Load the plane, and then using the button at the far right, select the skin you just made. If its not there then its either the wrong resolution, isn't 256 indexed color, is isn't a .bmp file. Hit 'Fly' and take a few screenshots with the 'Printscreen' button on the keyboard while the game is paused for future reference, focusing on any mistakes you see. If you're lucky, you can switch between the game and your graphics program using either 'Alt-Tab' or the 'Windows' key. I usually have IL2-FB open looking at the skin, and I hit the 'Windows' key on the keyboard to return to the desktop and correct errors. I switch back and forth between the two programs often as I work. I have to disable antialiasing for this to work however, and some PC's may just crash, so if you try it, keep that in mind.
Now, examining your skin, there's bound to be a problem somewhere, whether in the shading or edges of parts. Most common is a seam error, where a color difference is seen along the line where the skin seams together. Its usually lighter on one side of the seam than on the other. The quickest way to fix this is to use the airbrush tool. Get a clear idea of where the seam is, and which side is to light/dark, using a screenshot or from the game running in the background. You'll find the screen shots in the Forgotten Battles root directory, named 0000.tga, 0001.tga, and so on. These are overwritten each time you restart IL2-FB, so if you want to save one as a .jpg, do it now! Reopen your layered file, and move the color picker tool to the part of the seam you think is the correct color, and select that color. Now with the airbrush, spray that color in the general area of both image areas that form the offending seam. This may flatten the shaded effect of the skin in the area sprayed, but it will still look better than an ugly seam. Save the layered file, then save another .bmp copy, reduce to index color, move it to the right directory, and retest. If IL2-FB is open in the background you'll have to close and restart it for the newly corrected skin file to be shown in the game.
For me this testing process is the most time consuming part of detailed skinning. I made probably 20 checks of the skin shown in this tutorial. Short of having an expert understanding of the void your working on, this is the best way I've found to ensure a clean final skin. You can be as much of a stickler here as you like, but you should realize that there are certain things that cannot be corrected. The IL2-FB game engine sometimes shades different panels of the plane more harshly depending on the angle of the sun. If a particular panel looks overly dark or bright, be sure to roll the plane over, or turn it around, and get into a new light so you can determine if its the skin causing the difference, or the game.
Detail shading
If all is well in testing, then its time to start adding the detail shading to the paint. This process will be the same for most types of skins, whether shiny or painted. There's two ways to do this detailing depending on what tools you use. For using the Dodge and Burn tools to create the silvery metal, I'll have to work on the paint job layer itself, since you can't dodge or burn on a transparency. If you use the airbrush to detail, then you can work on a new transparent layer above the paint layer.
For this skin I'll do my detail shading right on the layer with the main paint job. Again, there's considerable risk of ruining your skin if you make major mistakes while doing this. I usually make a copy of the painted layer, in this case the Paint + Detail layer and put it above the original before I start work. Work on the new copy layer, so that if something goes wrong, you can always just delete the ruined layer and make a new copy of the original Paint + Detail layer. Only save your layered file when you are POSITIVE that your happy with what you've done.
The actual marks I make on the skin for detail lines are done with the dodge and burn tools. If the skin is a painted color, you can't use these tools, since they'll change the paint color. Use the airbrush tool, and for highlights, use a slightly lighter shade of the body color, NOT white! Use a slightly darker shade of the body color for shadows, NOT black. For either technique, lets start by taking a look at what I did to my skin.
I made a split screen of the same area of the skin to make it easy to see what went on here, its not very complicated looking without the Void layer on. Firstly, you can see the broader strokes from the rough shading of the Paint + Detail layer painted last step, where the top of the fuselage is lightened, and above the wing roots. The detail marks added in this step are the small highlights and shadows that run beside some of the panel lines on the Void layer. Notice that I was careful not to detail every line in the void, since a bit of randomness is what we're looking for here. For marks that are nearly horizontal or vertical, you can use the shift key to constrain the brush in just one direction. Be sure not to hold down the shift key from stroke to stroke! You've got to let off the key between each stroke, or unwanted marks may appear. You also should practice beginning to spray FIRST, then pressing the shift key. Otherwise the different strokes you make may become linked to one another with a diagonal line that streaks between the new mark and your last mark. Keep a hand on 'Control Z' for undo, and look out for this while you work.
The most important thing to get out of this is that you reall have to go over the entire skin, massaging it here and there until a certain 'rightness' is obtained. Experience is the best teacher here, but you'll catch on fast with just a little practice. A few points to remember for the best results:
* Subtle effects are best! Leave some areas with LITTLE or NO detailing. This is crucial!
* Highlight or shade right above or below a panel line, never directly on it.
* Be consistent with light source directions, try to keep most hghlights on the same side of panel lines.
* For greater depth on some panels, highlight on one side of the line, and shade on the other. This creates depth.
* Be careful to avoid a 'quilted' look. You don't want your plane to look like a tufted chair! Don't get carried away.
* Add extra highlighting to small details that would likely be raised in real life. Adds depth, and rarely looks bad.
* Add extra shadow underneath parts that extend from the plane. Exhaust ports and vents are good examples.
* Above all, make it look complex and random, even if it really isn't.
Don't feel like you have to make each side of the fuselage or wings identical. This is a huge mistake. Greater realism and variety are had with a more random detailing. Something like glare and sheen is not planned in the real world, and you really shouldn't plan much in the skin either. Just move around and work on what strikes you, then move on.
Environmental reflections
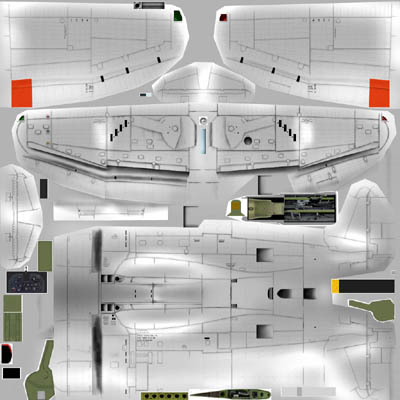
Since the IL2-FB game engine cannot provide reflective effects on planes, we have to simulate this in our bare metal skins. After a bit of testing different methods for faking reflections, I've decided that less is more. Simplistic implications of reflections are superior to detailed approaches every time. This would not be true if the skin were going to be used in a still image, but since we can move around in the game, any detailed reflections are painfully fake looking when the viewing angles and lighting change. To add the Environmental (EV) reflections, just add another layer above the top Paint + Detail layer, and select each area roughly. Lets look at what my layer looks like with the paint and void layers hidden.
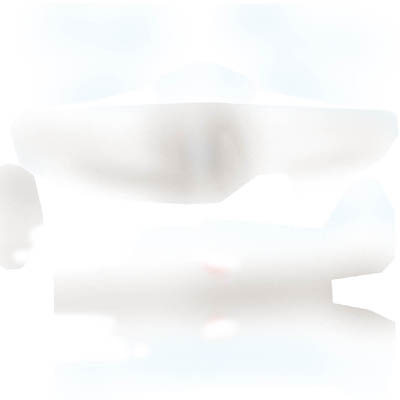
Examining the layer above you'll see a couple of things that need explaining. First, I used a 100 and 200 pixel airbrush to spray a light blue color over the top of the fuselage and wings. This represents the sky reflecting in the upper parts of the plane. Don't use a dark blue, since it will look too obviously blue when done. I did the same thing to the bottom of the fuselage and wings, this time using a light brown color. If I'd used green to do this, it looks good enough when flying normally, but if you turn sharply, or are upside down, it looks silly to have green facing the sky on the plane. Green also looks pretty bad flying on a winter map, or over water. Brown is a decent compromise, and could be the reflection of anything darker than the sky. Notice the bit of red near the rear of the wing root? Thats a fake reflection of the red paint on the wings, yet very near the fuselage. It looks close to real in the game.
When you do EV layers, the main point should be that they paint is very undetailed, very thin, and may not even cover all of the skin. You'll notice plenty of areas in the layer above that have little or no color on them. Doing this helps realism a good deal, since in the real world, the reflection wouldn't be uniform over the whole plane. When your done, and do some test flights to judge the quality of your work, you may find that the EV colors are too strong to look right. If they are, just increase the transparency of the EV reflections layer until things look better. No repainting is necessary.
Weathering effects
When planes are used, wear occurs, and we can simulate this easily on our skins. Take a look at photos of the aircraft your skinning to get the closest idea of where you should go with this in terms of accuracy. For my work, I just generalize the wear into basic types.
* Smoke marks (from exhaust and weapons firings)
* Paint damage (silver flecks showing through the paint)
* Fluid drainage (from exhaust and possibly cowlings)
* Outdoor storage (runoff from fluids and such will stain over time as they run down surfaces)
You should use your judgment in choosing what to apply to your skin, since not every one wants every type of wear markings, and some aircrafts may not have some types of marks. This is my weather layer with the paint and void layers hidden.
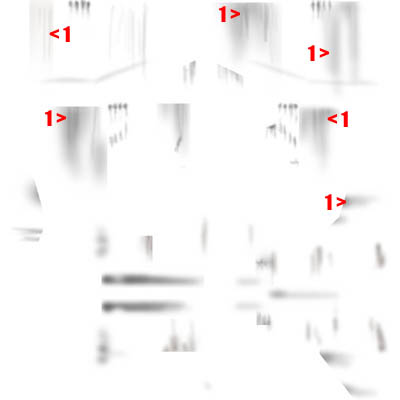
You can clearly see the smoke marks from the guns and exhaust. There are a few run marks on the side of the fuselage near the canopy area as well. I placed some drainage marks beneath what ever larger items would have extended from the plane. This is all quite easy, just keep adding until you get what you want.
Now a note about the areas marked with the number 1 in the above layer. These don't represent any of the wear types listed above. I use marks like this to change the sheen on the bare metal. It's generally uneven in the real world, and marks like this help to fake this. A few of the marks running down the fuselage serve the same purpose. The variety they add in terms of random shiny spots is very effective.
Wrapping up work
All thats left are a few items that are up to the individual skinner to decide whether to apply. First, to get a more pronounced and contrasty appearance for the void file, sometimes I'll copy the Void layer, and place it above itself with no modifications. Remember that when the remove white filter was used, that a bit of density was lost in the process. For skins needing extra panel contrast, like bare metal, doubling the Void layer is very effective.This also allows adjustment of the contrast by adding transparency to one or both of the Void Layers.
Lastly, you will sometimes find that adjusting the levels on a finished skin using the command [ Image : Adjust : Levels ] can improve the overall effect, if perhaps too much or not enough contrast of brightness were painted into the skin. Simply adjust until it looks right to you.
That completes the basic skin file for a bare metal plane. For clarity in understanding my layer arrangements, I'll show the layer stack for the completed skin now. Note the two Void layers, and the two Paint + Detail layers. Remember that the detail shading was done on the upper Paint + Detail Shaders layer, and the lower is always available for backup.
And finally the finished skin file with all layer visible.
In closing, I hope that this tutorial has been a help. I'm not the best skinner in the world, but by using techniques like these, you should be able to make just about any skin you'd like to fly. Thanks for reading this through, and happy skinning from adlabs6!
Last edited by Serval; 18th November 2015 at 15:40.
 Posting Permissions
- You may not post new threads
- You may not post replies
- You may not post attachments
- You may not edit your posts
-
Forum Rules
 Forum Guy


 Reply With Quote