


 Reply With Quote
Thanks Adlabs for posting this.
I have tried a little with repainting in FS, but never really got it to work. This how ever might help me get started for real.
Not that I have the time at the moment, but later.

 Forum Guy

Repainting in FS2004
by adlabs6 11/16/06
For those coming from the IL2 series, creating a new skin, or 'repaint', for FS2004 is not the straight forward process that many are used to. There are some extra steps required relating to file compression, mip maps, and alpha layers, but the effort is rewarded with opportunity for more detailed artistry. This article will focus on those steps and how the techniques can be used in creating a new livery. Before getting into the processes in detail, I'll take a moment to talk about the programs required for this article, ImageTool and DXTBmp.
Imagetool
Imagetool is a utility developed by Microsoft, and is included with the FS2004 Gmax gamepack. Information about how to locate this gamepack is avaliable here. This gamepack is designed for developers using gmax to create addons for FS2004, and enabled the export of 3D models in compatible formats. However, once the gamepack is installed our interest will only be in Imagetool, which can be found at the following directory:
C:\Program Files\gmax\gamepacks\fs2004\tools
Loading up Imagetool reveals it's very sparse interface. Textures for FS2004 are simply loaded into the application, which will then display the file. Looking to the right hand side, the information reported will tell you the filename, filesize, image dimensions, the compression system (more on this later) and whether there is an alpha layer. The last two items are related to whether the texture has mip maps and how they are being displayed.
Most of the essential areas in Imagetool for a skin artist are in the menus. I'll mention some of these and what they do.
Image : Format - The list of image formats is shown here, and the checkmark indicates which format the currently loaded image is saved in. Selecting another from the list will make the conversion to this format, which then will need to be saved.
Image : Create Mip Maps - This command is useful when you want a texture to contain mip mapping. Clicking this item will automatically generate a set of mip maps from your loaded texture. Saving is required after creating.
View : Alpha Channel - When checked, this will show the alpha layer instead of the main texture from the file.
View : Zoom - The controls are here for zooming on the texture in the application.
DXTBmp
The DXTBmp application is developed by Martin Wright, and is avaliable for download here. After lauching the application, you'll notice that there is a much more friendly interface. Looking at the program, the main window is showing the texture from the open file. To the upper right is a small preview window which shows the alpha layer from the file, if avaliable. Also on the right side are the mip map settings and at the bottom, a button which allows you to select your preferred image editing application (choose the program you create your skins in here).
Screenshot showing DXTBmp with labels.
Below each preview is a series of icons that automate some of the steps in the file editing process. I'll cover some of these buttons functions below.
First the folder with the upward arrow, which simply lets you load a texture into the program, or for the button beneath the alpha preview, load a bitmap as an alpha layer. The folder with the downward arrow brings up a save dialog for the current image, and for the alpha preview this button will save the alpha layer as a bitmap. Next is the small image with a downward arrow. This is a handy one-click tool to open the current texture in your chosen image editing application, which is selected as mentioned above. The same button beneath the alpha preview opens the alpha channel in your editing program. It's very useful to note here that clicking these buttons will launch your image editor and load the texture or alpha with NO extra conversion steps! This is a very big time saver! Simply make your edits, and click SAVE on the file. The file will be saved in a temporary spot for now, but don't worry about where just yet...
Next button to the right is a small image with an upward arrow. Clicking this image will grab that temporary save from your image editor, and replace the existing texture or alpha (which ever you edited) with the new version. Very simple.
From here there are some buttons unique to the texture and alpha previews respectively, so lets look at those starting with the main texture window. Firstly there are two buttons, with horizontal and vertical arrows. These are used to flip the image or alpha (or both) in the horizontal or vertical plane. Right click these buttons for some extra options. Last is a magnifying glass, which previews the current texture in a new popup window. Right clicking this icon gives a selection of compressed formats which can be saved in, and when clicked the preview will show the results of this compression.
Moving the the alpha preview window now, after the 'refresh after edit' button is the 'create new alpha' button. Clicking this button will create a new alpha layer that is blank, replacing the existing alpha layer if there is one. This is a very useful way to remove an existing alpha layer if it's giving problems. Finally, the magnifying icon will popup a new preview window which shows how the alpha layer will create transparency in the texture. Transparency is shown in the preview as checkered squares.
From what's described here, it should be clear that DXTBmp is by far the easiesr of the two programs presented. Imagetool can be used in a pinch, but it requires significantly more manual operations to get to the same result. For the duration of this article I'll assume the reader is using DXTBmp.
About the compressed file formats
Also see this article for information on color depth and conversion.
Just briefly I'll talk about a couple of the most common formats that textures are saved in for FS2004 aircraft. First is '32bit' mode, which is really an uncompressed 32bit BMP file, having 24bits in the main texture (8bits per channel) with an additional 8bit alpha layer. File sizes will be largest with this format, and will also take the longest to load in FS2004. The second common format is DXT3, which is a part of the S3TC group of algorithms. The DXT3 format saves files with a 'lossy' compression, meaning that during the compression some image data is lost resulting in slightly lower image quality. The format uses 4bits per color channel for the texture, and an additional 4bits for the alpha layer, resulting in a 16bit image. The primary advantage to using DXT3 is the savings of disk space and significantly faster loading due to the smaller file sizes.
Ultimately DXT3 is a very common format and provides good visual results overall combined with faster performance, whereas 32bit is best used only where the highest quality is needed.
[BREAK=Getting Started]
Getting started: Editing an existing texture
A project frequently attempted by both beginners and more experienced sim users is editing an existing texture to change or add some detail for personal preference. This process is very easy using the DXTBmp program detailed previously. I'll outline the steps needed to get through this project below.
Loading the texture in your image editor
A texture saved in 32bit format should open up in your image editing software with no extra steps needed. The image will be reported as an 'RGB' format image, and you should be able to also find the alpha layer avaliable also...
However! I still recommend using DXTBmp to load a 32bit texture into your editor for beginners! This will greatly simplify any editing of the alpha layer, which will be covered in more detail below.
If the existing texture is saved in DXT3 format, we can use DXTBmp to separate the texture image and alpha and send them to the image editor. Firstly, make sure you've chosen your preferred default image editor in DXTBmp. Now all you need to do is open up the texture file you wish to edit in DXTBmp, and then click on the 'send to editor' button for either the main texture or the alpha layer. Your editor should launch with the appropriate part of the texture loaded and ready for editing.
Lets take a moment to consider some things about working with files that DXTBmp has sent to the image editor. Firstly you'll notice that the file names are not the same as the source texture. In fact, the main texture is always titled norm.bmp and the alpha layer is always titled trans.bmp when in the editor. This is because DXTBmp exports and saves a copy of each of these files in a temporary location for the editing process, and when DXTBmp refreshed the edited copy, it expects to find those exact same filenames in those exact same temporary locations, and all during the same time that DXTBmp has been running since the export!
Most of the time, a texture project is going to take more time that a single sitting to finish. In this case you can work around these issues quite simply.
1.) Export the texture or alpha (or both) from DXTBmp into your editor, and leave DXTBmp running.
2.) Use the 'Save as' command to save the image as a layered file (the filename can be whatever you like), and save it in what ever directory you'd prefer. You can close DXTBmp at this point.
3.) Work on this layered file during your work sessions. When done, save a copy of the final artwork as a 24bit bmp file that you'll use in the later steps to resave the file for FS2004.
Editing the texture
Once the texture is inside the editing program, the techniques common to all texture painting processes apply. For instance, adding a different tail number, or some noseart, is done by simply adding a new layer to hold the new artwork and blending it into the layers below. The details of these processes are outside the scope of this article, however a variety of the different techniques used during this segment are detailed in articles located herein the Simmers Paint Shop library for easy reference.
Loading the alpha layer in your editor
Working with a 32bit texture, you'll find any existing alpha layer either as a 'saved selection' or on the 'channels' palette in your editor. But as mentioned above, if you use DXTBmp to send the alpha to your editor you'll save some headaches. The editing or alpha channels is much like editing textures, but there are some rules we should look at that apply to how FS2004 reads this alpha layer.
Screenshot of an example alpha layer.
Firstly, upon loading the alpha layer in your editor you'll notice the image is gray scale. This is due to the layer being saved using only 8bits (in 32bit format) or just 4bits (in DXT3 format), where only a limited gray palette is avaliable. The gray tones themselves are what FS2004 uses to determine how reflective each area of a texture should be. Specifically, in FS2004 any white color areas are considered to be non-reflective, and any black areas are considered to be totally reflective. Tones of gray between white and black are used to represent varying levels of reflectance.
Examples would be a shiny metallic area on an aircraft will be a darker gray color, while the painted metal surfaces of the aircraft will have a very light gray color on the alpha layer. Use of black, or total reflectivity is quite rare, though I've seen it used to good effect on small chrome parts.
Also see this
Editing the alpha layer
Once loaded in the editor an alpha layer can be edited using the same methods as the texture layer, just in gray scale. Specifically, DXTBmp sends the alpha layer to your image editor in indexed format, thus limiting the palette to grays only.
One difficulty that can come up with editing the alpha layer is getting your edits to line up with the texture details, which are not visible on the alpha layer sent by DXTBmp. This can be solved using the steps below. Looks like a complex list, but it's quite simple once learned.
1.) Change the alpha layer color mode to 24bit 'RGB' color mode, from the default 'indexed' mode. Be sure the file you are working on is named trans.bmp, as this is the name of the alpha layer that DXTBmp exported for us, and it's got to be this same file we save in order to rejoin it with the texture in the end.
2.) Copy and paste the main texture as a new layer on top of the gray alpha layer. You must paste into the alpha image (filename from DXTBmp is trans.bmp) in order to get the right result.
3.) Now you can adjust the layer transparency of the texture layer so you can see the alpha layer showing through.
4.) Select the alpha layer and make any edits you need to working on this layer, or any other new layers you've added above it. Use the partially transparent texture layer as your reference for placing the gray tones.
5.) When your edits are done, it's time to reconvert trans.bmp back to indexed gray colors and save. The first thing to do is hide any layers that are not a part of the final alpha artwork. Next use your image editor to change each remaining layer that's part of the alpha artwork to gray scale. Some handle this as 'remove color', or 'desaturate'. Check your editor application help files to find this tool.
6.) With all visible layers converted to grays, and all non-alpha related layers hidden, it's time to convert the image to 8bit indexed mode. In Photoshop Elements 2 this process will merge all visible layers, discards all hidden layers, and opens a dialog box. This dialog box gives some choices on what type of index will be applied to the image. Choose 'exact' or 'custom' to keep the palette as close as possible to the gray tones you've painted. The 'Web' or 'System' index settings will most likely add dither noise to your alpha layer and ruin it, so avoid these settings.
7.) Save the image, and it's again important to check that you are saving trans.bmp at this point. After saving, head back to DXTBmp and press the 'Refresh after edit' button under the alpha layer preview window. You should see the new alpha layer appear in the preview.
Note that DXTBmp will either have to be opened through out this series of steps, or you'll have to use the work around listed above to get the alpha layer into a saved file. Getting the saved file back into DXTBmp is covered in the next section.
More advanced users will probably have both an alpha layer as well as the main texture layer inside their layered file in which they work on their texture project. These layers can be copied out and pasted as needed from there.
[BREAK=Wrapping Up]
Finalizing the edited texture for FS2004
Now it's time to combine the texture and alpha in DXTBmp to create your final texture file for FS2004. Recalling what we learned in the section "Loading the texture in your image editor", we've got to get the files norm.bmp and trans.bmp back into DXTBmp in the same order it expects them.
When you're ready to add your finished artworks back through DXTBmp to create your final file for FS2004 you can follow these steps, which keeps DXTBmp happy finding and rejoining the files.
1.) Open the original texture in DXTBmp, and export what ever parts of the file you've made changes on into your editor. Now you've got a new set of norm.bmp and trans.bmp fresh from DXTBmp to save over. Keep DXTBmp open in the background!
2.) Open up the 24bit bmp file you saved of your artwork. Copy and paste yoru new texture into norm.bmp, and similarly you'd copy and paste your completed alpha work into trans.bmp.
3.) Save both norm.bmp and trans.bmp and switch back to DXTBmp, and hit the 'refresh' button for each preview you made changes to. You should now see the new texture and alpha in the preview windows.
Once you've got the texture and alpha layers together in DXTBmp, you can begin to think about saving the file for FS2004. At this point you'll need to decide what format you wish to save in, either 32bit or with DXT3 compression. Be sure to take a look at the descriptions of these two formats in the "About the compressed file formats" section of this article to understand the benefits each provides.
When you've decided on a format and are ready to save, it's time to think about Mip Maps. Usually, mip maps are not included on textures for aircrafts, as the mips will sometimes create blurry effects. Be sure that the check box 'Include when saving' is NOT checked on the Mip Maps options box on the right hand side of DXTBmp.
See this
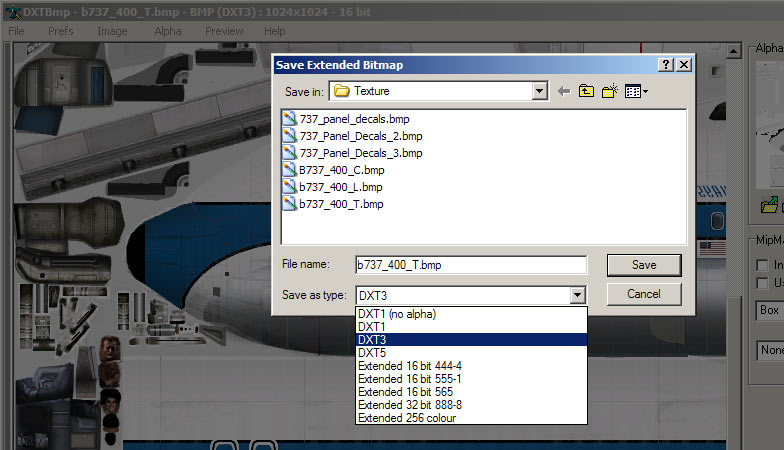
Finally, using the menu File : Save as > Extended Bitmap you can begin to save your final file. On the save dialog, you can choose your file format from the drop down box. Select DXT3 to compress the final file into DXT3 format, or choose 'Extended 32bit 888-8' if you'd prefer a 32bit format. Save the file as the correct filename, and in the correct path (these should be correctly shown by default, but double check anyway).
Screenshot of the 'Save as' dialog in DXTBmp.
Testing the new texture in FS2004
Close your editor and DXTBmp and launch FS2004. Load up the aircraft you've textured, and select the proper livery from the drop down menu. Once loaded up you can see how your work turned out. You may need to make changes (most likely in your original layered working file), just repeat the steps given above when you're ready to re-assemble the file for FS2004.
Advanced texturing: Working from 'paintkit' templates or from scratch
There are some differences to the above workflow for those who are working from a blank template (such as those provided in paintkits from addon developers) or for those working on a texture from scratch using a self made template.
The biggest change is that when working on a template you'll not have first exported your texture and alpha from DXTBmp, and that in fact there will be NO such textures to export from! In this case, it can be helpful to create the necessary new directory to contain the new textures, as well as edit the appropriate lines in the aircraft.cfg file so FS2004 can find the new texture.
After you've got the new texture folder created, it's helpful to fill it with a copy of all the textures from a default livery so you've got some base to work from, and can overwrite the files in this directory as you go. When you're ready to save, use the same steps listed above, only this time you'll be opening up the copies of the default texture, pasting your own artwork, and saving over the file in the appropriate format.
1.) Open the copy of the original texture (be certain you're in the correct directory!) in DXTBmp, and export what ever parts of the file you've made changes on into your editor. Now you've got a new set of norm.bmp and trans.bmp fresh from DXTBmp to save over. Keep DXTBmp open in the background!
2.) Open up the 24bit bmp file you saved of your artwork (this can be saved from your layered file using the 'save as' command). Copy and paste your new texture into norm.bmp, and similarly you'd copy and paste your completed alpha work into trans.bmp.
3.) Save both norm.bmp and trans.bmp and switch back to DXTBmp, and hit the 'refresh' button for each preview you made changes to. You should now see the new texture and alpha in the preview windows.
Save the file, same as outlined above in the section "Finalizing the edited texture for FS2004" and continue from there. Once you've got each of the original texture files you're going to edit saved, you can check that you're not forgetting to texture any parts of the aircraft when previewing in FS2004, if so you'll see the default textures on those parts that still need new texture work.
Closing comments
Hopefully this article has given you the guidance you'll need to create or modify aircraft textures in FS2004. If you find a work process that works better for you, feel free to use it so long as you still get the desired results in FS2004... that's the important part.
Finally, in this article I've not tried to tell you 'how' to paint or given any tips or advice on different techniques. For these type of questions, certainly check our articles section here for any other articles which might help, and post any remaining questions in our forums here, some one will certainly try to answer.
Last edited by Serval; 18th November 2015 at 15:32.
Senior Member
Thanks Adlabs for posting this.
I have tried a little with repainting in FS, but never really got it to work. This how ever might help me get started for real.
Not that I have the time at the moment, but later.
RAF_Loke
Forum Guy
Hi Loke, hope this can help get you on a successful project sometime. BTW, this is the first in a series I've planned. Other articles will be spaced over the coming weeks as I can get through them.
Member
Good work mate.
Very helpful to get into it. Changing from il2 to fs9 painting indeed requires some alterations in the personal processes and it'S good to see them all at once here.
Like Screenshots? Want to learn more? Visit:
Junior Member
Been using DTXBmp and Photoshop CS2 for all my repaints and doing great what with all the different tutorials out there. My problem is Pilots! I can not change a pilots face. Every time I do it turns up grey in the cockpit. Does anyone out there know how to do it?
Tim
Junior Member
Hello I'm a new member, I found your website by chance looking for an answer to a problem which I found on here, thank you.
I'm fairly new to repainting aircraft and I enjoy it, being new to the subject I bought FS Repaint which is very easy to use but it obviously lacks a lot of the tools needed to do things to make the aircraft look more professional.
I don't have Photoshop but I have a copy of Coral Painter v8 from my old PC, I haven't installed it yet but before I do I wondered if it will do for the more detailed editing and will it perform some of the tricks and tips you guys mention on this forum?
I have uploaded some of my paints to AVSIM, rather than display them all here if you type my name colin reece in the file search you can view them, I would appreciate your comments, remember I did these with FS repaint and I'm not a pro like a lot of you guys.
Col.
Senior Member
it should do the job, i use PSP for repainting fs9 aircraft (and fsx come to think about it) and yup it does the job nicely, as long as you are familiar with how to use its tools it'll do fine. i'm currently working on bump maps for FS9 and let me tell you its tough, but well worth the effort.
Junior Member
Well there was a flaw on the disk so I ended up buying a copy of Paint Shop Pro v8 off Ebay, I'm learning slowly.
Senior Member
if you need any help Col PM me and i'll be glad to help out.
Junior Member
Thank you for the reply ans kind offer, I opened a simple graphic/file the other day and just played around with it.
I tried all the different tools and options just to see what they did.
Col.
 Posting Permissions


