


 Reply With Quote
This is very thorough stuff Otter, easy to understand and follow.
Please keep up the good work.
And thanks for the teeth.

 Retired member

You need to have Photoshop open with the image selected that you intend on working on first. To make a quick mask, begin by selecting the magic wand tool.
Start with a tolerance value of about 25 for fairly even toned colours. The area I want to work on is pretty rough, so I?ll use a tolerance of 50.
Click anywhere within the area that you want to work in with the Magic Wand tool and a selection is started. The selected area appears as a series of ?marching ants?.
Hold down the shift key. The Wand will appear to have a little + on it. This indicates that you are going to select more colour within the same area. If you don?t do this, the new selected area will replace the old one. You can subtract from the area by using the Alt key in the same way, but we want to add to this selection.
That?s pretty good, but there?s an easier way to do this called Quick Mask. This method will NOT work unless you have some portion of the image selected no matter how small it is. To select Quick Mask, go to the bottom of the tool box and click on it. What comes up is an image that looks like it has been covered in rubylith.
It?s too difficult to see what?s going on with all that red, but it?s easy to change that. Double click on the Quick Mask icon. Up pops a dialogue box. You can change the mask colour by clicking on the colour box and selecting any colour you want. You can also change the opacity too, but I?d leave it at 50%.
Now we can see much better! I?ve already done some cleanup.
Using the brush tool you can add or subtract from this area. Set brush hardness all the way up to 100 for this task because a soft edge here can cause real headaches as you?ll see later. You can also use the eraser tool to remove excess selection. To switch brush colours, click on the bent arrow. Get used to using that because it?s used for other features too.
It looks not to bad, but you can?t really tell unless you zoom in on it. I did a bit more painting with the white brush and selected too much, but that?s OK because I can come back in later and correct that with the black brush. You?ll want to change brush sizes on the fly frequently, and this is easily done using the [ key for smaller and the ] key for larger diameters.
You can check further by clicking out of Quick Mask mode. I click back and forth quite frequently in one of these sessions. The mask still needs a bit of work. What is really decieving is the arm on the ?1? though it looks to be close to complete. You?ll see why in the next phase.
2. Saving the selection as a mask.
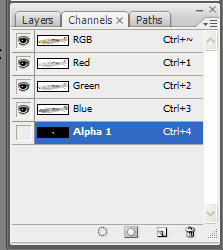
Another way of checking and editing your work is through the use of alpha channels. When using Quick Mask if you save and close, the program will remember the Quick Mask. If you are in standard mode though, your work will be lost and cannot be recovered. If the mask is an important one, it should be saved as an alpha channel so that it can be recalled at any time. In the layers palette group, click on the channels tab to bring it forward. Turn off the visibility on all the layers except for the quick mask at the bottom.
Now your errors REALLY show up! Remember the warning I gave you about using the brushes at 100% hardness? The arm on the ?1? clearly shows that even though the masking looked relatively fine, it really isn?t. It?s difficult to tell if all the masking material has been removed or not in either mode, but here it?s painfully obvious! Let?s get this saved as a channel first before we forget.
With standard mode still active in your main window, click the Save Selection as Channel button.
A new channel, Alpha 1, appears at the bottom of the Channels palette. Now there is no danger of losing the mask if you save and close.
Corrections in this mode are done the same way as in normal or Quick Mask mode. Use the brush tool or the eraser tool to add or subtract from the masked area. Here I?m using the white brush to remove the excess pixels on the inside of the mask. Using the eraser tool adds to the mask. I know it?s a bit backward, but that?s the way the program is designed. Make sure to save after making any desired corrections.
To load a mask as a selection, open the Channels palette. Turn the Alpha channel off and all the others on. Your image will appear normally but with the mask in place ready for you to work on. You can have many Alpa channels, but if you aren?t careful about naming them it will be difficult to tell what some of them are from the thumbnails.
Choose Select>Load Selection. Now you can start changing colours, applying filters or changing brightness, hue and saturation without affecting any other part of the picture just as though the selection was on its own layer except that you can?t move it around.
3. Extracting an image.
This is really cool! There are times when you want an image from one piece to use on another, but the details are so fragile that it?s very difficult to mask using conventional methods. To use this method, both images must have the same DPI resolution or unexpected results may occur. Begin by opening the image you wish to extract from. Choose Filter>Extract.
On the right side of this new window, choose the marker size you want. I used 12 for this, but a smaller size is not necessary. This method distinguishes between the colour selected and the background it?s on, so even accuracy is unimportant.
Using the Hilighter Tool, click and drag to block the nose in. Then make a stroke on all the parts that protrude beyond the fuselage.
It?s OK if you are messy about things because the Extractor makes its selection by finding the difference between the contrast in pixels. I made a poor choice to use as an example because of the low image contrast. Oh well?.live and learn.
Select the Fill Tool under the Highlighter Tool and click inside the nose area to fill the interior.
To preview the results, click on the preview button near the top right. If you are satisfied with the results, click OK to accept the extraction. If you are not happy with the results, Go to the preview menu at the bottom right and select Show:>Original. Continue to work with the tools in the Extract dialogue box to add or erase from the extraction until you are happy with what shows in the preview pane. You may need to go back and forth several times before you get the results you want. To remove the fill, click on it again with the fill bucket. If there is sharp deliniation in your selection, try the Smart Hilight marker. Zoom in if you are having difficulty with smaller details.
This method excells when you are doing several variations of the same aircraft. Slap on a drop tank or switch armament in an eyeblink. All you need to do is copy the image into the new drawing as another layer, size it and do any other tweaking required. Too easy!
This tutorial is meant to show you the possibilities using these tools. It does not mean that it is the best method for the task at hand, or by any means the quickest. Only you will be able to determine what works best for the methods you generally use.
Cheers!!!
Otterkins2
Last edited by Serval; 20th July 2009 at 17:30.
Senior Member
This is very thorough stuff Otter, easy to understand and follow.
Please keep up the good work.
And thanks for the teeth.
 Posting Permissions


