


 Reply With Quote
nice

 Forum Guy

Paths, Selections, and Channels in GIMP
by adlabs6
March 14, 2007
GIMP is a free graphics package that has been avaliable for several years. My first experience with GIMP came a good while ago, and it was not a pleasant experience. Frequent crashes made my working on a project almost impossible to manage.
About two months ago I started wondering what ever became of the GIMP project, and decided I'd give it another try with it's most current stable release. I can happily report that release 2.2.13 has been wonderfully stable on my WinXP machine. Shortly after I decided that I would write a few tutorials on using the GIMP for skinning or profile creation, focusing on the parts of the application that would be most useful for artists new to the software.
In this article I'll look at the application of paths, selection tools, and channels in creating selections.
Paths
The first feature I'll look at is the path tool. I'll outline this tool first because it is also useful during the creation of selections, which we'll cover later.
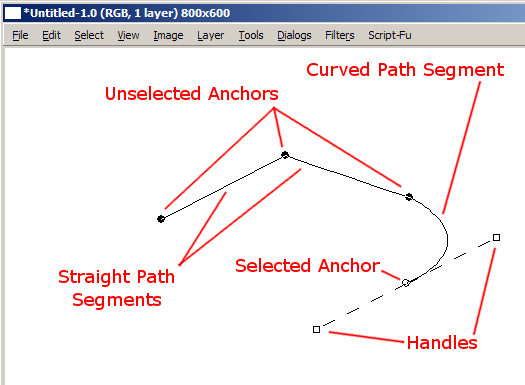
Paths in GIMP are vector shapes, which are handled in their own layer stack separate from the main raster layer stack. A vector shape is not made of pixels, such as the bitmaps we are used to working with, but are instead made up of anchors which have mathematically calculated lines and curves between them. Below is an example showing each of the parts of a vector path.
Anchors in GIMP are the points around which a vector path flows. These anchors are shown as either black circles when they are not selected, or as white centered circles when they are selected. Between each pair of anchors in a path, we have a line which can be either straight or curved. The curve of a line is controlled by the handles extending from the anchors on each end of the line. Moving the handles will change the angles at which the line exits the anchor on it's way to the next anchor. This allows us to create very smooth and flowing curves.
Let's look at the basics of working with a path. Firstly, you'll want to get acquainted with the paths layer stack. This is just like the raster layer stack we normally use in creating a skin or profile, except that only vector paths will be on these layers. Handling these layers is much like handling a raster layer, you can drag them into your preferred order, duplicate, and delete layers, as well as some special functions we'll cover in a few moments.
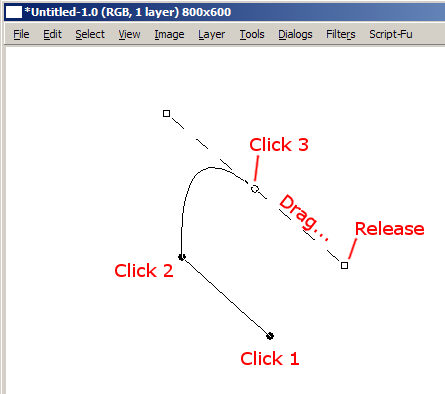
To create a new path on it's own layer, you can simply pick the path tool and if there are not any other paths currently active (you can tell by looking for any anchors), just click to create a new anchor and it will be created on it's own new layer. From here, as long as there are anchors visible, any new clicks will create anchors in the currently active layer. So you can click a few times to make a simple path. Notice that if you click and drag while creating an anchor, the line connecting to the previous anchor will become curved, and a pair of handles will appear. This will also cause the next new anchor to have it's line curved also, which you can adjust later on. An example of some clicks and drag-clicks:
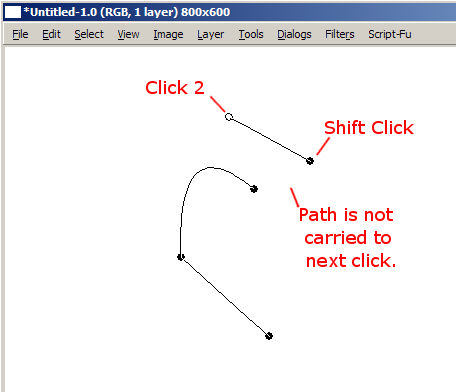
Now lets say I want to create a new path, that is not connected to the shape I've created already, but I want it on the same active layer. This is done by holding the SHIFT key while clicking to make my next anchor. From there some more clicks for more anchors. Remember that each time you hold SHIFT before clicking to create an anchor, the path line will start fresh from your current click.
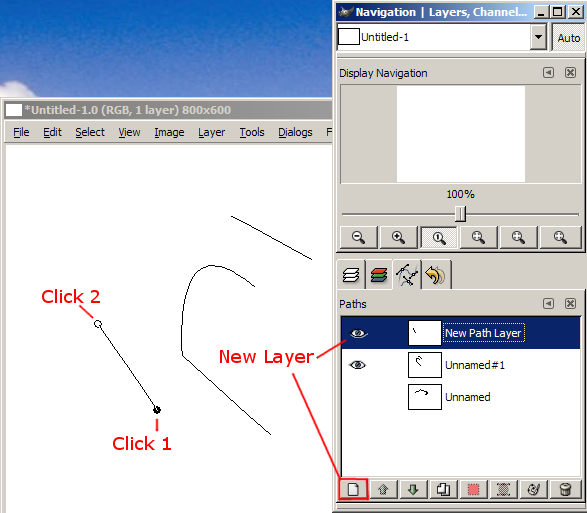
Similarly, what if I want a new path on it's own new layer? This is done by clicking on the 'New Path' button at the bottom of the path layer stack window. From here the layer is named, and clicking with the path tool will create new path anchors on the new layer.
Now lets explore the various ways we can edit paths. The first consideration is paying attention to which path layer that the edits are being done on. You can choose which layer you wish to edit by clicking (or double clicking if you currently have no path anchors visible) on the desired path layer from the stack.
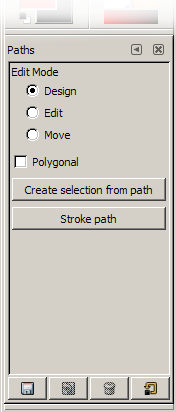
Once the proper path layer is selected, the path tool is used to do any edits to the existing paths in the layer. We'll take a look at the paths tool options dialog now to get to know what it's controls do.
Under the 'Edit Mode' section of the path tool options dialog, we see three radio buttons titled 'Design', 'Edit', and 'Move'. These control the different modes that the path tool functions in.
Design Mode
Design mode is the normal mode for creating a new path, and is the mode that we used for all the steps we've outlined above. Each click adds a new anchor to the path, and click plus drag creates curved paths between anchors. We can also click back on existing anchors, and then drag them around to new locations to adjust the path shape. For anchors which have handles, we can also click on the handles to adjust the curve shapes while in the design mode.
Another feature of design mode is being able to click on a line path itself, which will select both of the anchors to which the line segment attaches. This feature can also be used to create a curved line from a straight, simply by clicking and dragging on a line segment. The line will follow the mouse drag, and handles will extend from the anchors at each end of the line, which can then be adjusted individually themselves.
Finally, modifier keys can be used to expand the path tool functions in design mode. These modifiers include:
*Shift + click on an existing anchor to select or deselect multiple anchors. This is very useful, just hold shift while clicking on any anchors which you wish to move together. Clicking a selected anchor while holding shift will deselect that anchor. Then you can click on any one of the several selected anchors and drag, then entire selected group will travel together.
*Control + click on an existing anchor to make the path a closed shape. This is a very commonly useful action. The next click with the path tool after closing a path will create a new path component that is not connected to the closed path.
*Shift + click on an existing line segment to symmetrically adjust it's curve.
*Shift + click away from an existing path to create a new, separate path on the same layer.
*Shift + control + click on an existing anchor to delete it.
*Shift + control + click on an existing path to delete the line segment, while leaving the anchors in place.
*Control + click on an existing anchor allows only the curve control handles to be adjusted, while leaving the anchor in place.
*Control + click on an existing line segment will create a new anchor in the line segment at the point where the cursor is. This is very useful when a path shape can be improved by adding an additional anchor to refine the overall path shape.
*Alt + click on an existing anchor or line segment will move all connected anchors and line segments together. Other paths in the same layer which are not actually connected to the selected path will NOT be moved. Use this to reposition a completed path to a new location without within the layer, while leaving other paths on the layer where they are.
*Alt + click outside any paths or anchors and all paths which are in the layer will be moved together.
For those who may have noticed, while holding down the control and alt modifier keys you'll see the radio button on the paths move between design, edit, and move modes. The control key switches to edit mode, and the alt key switches to move mode, while the modifier key is held. Clicking the radio button is essentially like holding down the appropriate modifier key for the desired mode, which may be useful when doing many edits which would otherwise require holding the modifier key. You can also see some of the modifier key shortcuts listed in the statusbar of the active image, interactively changing as you mouse over the image.
Now that we know how to create and edit paths and the control the path layers in the stack, lets take a closer look at some of the more useful aspects of paths to skin and profile artists.
Path to Selection
Supposing I've used paths to create a shape which I'll use to create a component of an artwork I'm creating. I can use a path I've made to create a selection area that can be used for my raster painting. This is done by using the 'Path to Selection' button at the bottom of the path layer stack. There are also several modifiers (shown in a tooltip when hovering over the button) which can be used to control how the selections are applied. Shift adds to the current selection, control subtracts from the current selection, and control + shift intersects with the current selection.
Selection to Path
This is as you would expect, the exact opposite of the 'path to selection' tool. This button is also at the bottom of the paths layer stack window. Clicking will convert any selected areas into paths in a new layer. Some testing with this feature shows that a path created from a selection is limited in quality by the resolution of the original image, and may have some less than perfect smoothness. But it's a starting point for refining the generated path shapes.
Paths as a Polygonal Lasso Selection Tool
The version of GIMP used for this article, 2.2.13, does not have a polygonal lasso selection tool, though future versions may have this feature added.
It is possible to use the paths tool as a replacement for a polygonal lasso, and the tool even has a polygonal mode to help in this, located in the paths options dialog.
When using the paths tool in polygonal mode, you cannot create curved shapes by dragging the mouse when creating a new anchor. Instead, the polygonal mode will simply move the new anchor around while the mouse is dragged, keeping the line segment perfectly straight.
This can be very useful when creating a quick selection of an area, then creating a selection from the path to work in your raster layer artwork. It's a few extra steps compared to a true polygonal lasso selector, but since the polygonal path is editable more easily than a standard selection marquee, it has it's own advantages.
Selections
In GIMP, selections are pretty much like most other graphics applications I've used. There are six different types of selection tools in GIMP, we'll look at each one below.
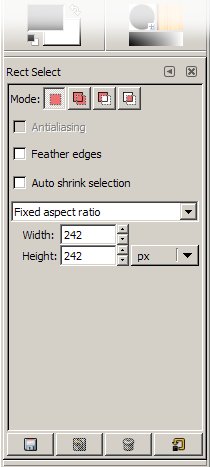
Rectangular and Eliptical Selections
Rectangular selection is just that, standard click and drag to select rectangular areas. Holding Shift adds to the selection, holding control subtracts from the current selection, and control + shift intersects the current selection.
Eliptical selection is identical to rectangular, including the modifier keys.
A special note on the modifier keys above. They only need to be pressed at the beginning of creating the selection. After the click the modifier can be released. The reason for this is so that you can use the shift key again to constrain to either a perfect square or circle, depending on the tool you're using. The button press sequence would be:
*Modifier + click to start the next selection in the desired mode, such as Shift + click to create the next selection as an addition to an existing selection.
*Release the shift key, but continue holding the mouse button down.
*Press shift again, and continue dragging the mouse, you'll see the selection shape is constrained to a perfect square or circle. Releasing shift before the mouse button will allow for free selection again.
Both of these tools share similar options in the options dialog box.
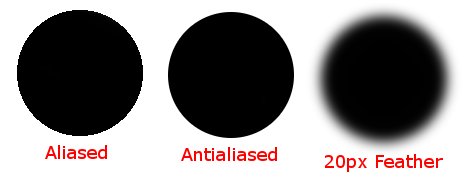
In the screenshot you can see the four selection mode buttons (each toggled by modifier keys or by pressing the button). Below is the antialiasing option which is avaliable only elipticals (rectangles are selected on the pixels edges and thus can't be aliased), this will allow smooth edges on rounded selection edges.
Next is feathered edges, which adds a soft feather to the edges of a selection. You can adjust the level of feather on a slider which appears when you check the option box. Below is a sample of what results this option can produce.
The 'auto shrink selection' option is useful for when you want to make a selection of a shape that is in a transparent layer, and you want to exclude all the transparency and just select that one item. When you use the auto shrink option, when you move or copy/paste the selected area, the selection will be reduced automatically to only include the object.
This is the option you'd want if you were selecting a marking or insignia out of a template to paste into your artwork. Remember that it must be a graphic that is in a transparent layer, since the auto shrink only removes transparency.
Free Hand Selections
This selection tool allows you to make hand drawn outlines into shapes. Just click and drag, following the desired shape as best you can. When you release the mouse button the shape will be automatically closed and a selection marquee will appear. Options for this tool include the standard add, subtract, and intersect modes, as well as an option for antialiasing and feathering, as illustrated with the square and ellipse tools.
Select Contiguous Regions
This tool will make selections based on finding areas of continuous similarity. So for example a large area of blue sky can be selected with a single click. Results may not be perfect, and the quality of the selection will be dependent on the resolution and quality of the image you are working with. Also keep in mind that any areas selected with this tool will be continuous areas, meaning that they are connected together as one piece.
Aside from the mode, aliasing, and feather options, there are a few special options to look at with this tool. First is a check box for 'Select transparent areas', which toggles whether the tool can be used to select areas of transparency from layers. So for example on a layer that contains a small graphic, clicking with this tool in the transparent area around the graphic, the entire transparent area of the layer surrounding the graphic would be selected.
Next is the 'Sample merged' check box. When checked, this option will ignore separate layers when making selections, and instead will draw it's selection from all layers that are currently visible in the image. This can be a useful option if you have an area such a camo patterns which are spread over several layers, but you want to select all the similar colors together with a single click.
The final option with this tool is the 'Threshold' slider. Moving this slider to higher values controls how sensitive the selection is to variations of color within a region. Lower values will make the tool very sensitive to small changes, even to the point that only a few pixels will be selected within an area that appears to the eye fairly continuous. Higher values will make the tool select areas of color which are progressively similar to the color of the pixel that was clicked on.
Select Region by Color
The features and options of this tool are very similar to the contiguous region selector, except for one important difference. This tool selects ALL similar color regions, from ALL areas of the image. Meaning that where the selections by the contiguous selection tool will be connected as on continuous area, the color selection tool will select multiple disconnected areas all over the image.
Select Shapes from Image
This tool lets you click around an image, creating anchors between which the program will attempt to find a path that flows along the features of the image. So if you are trying to make a selection of a red area surrounded by white, clicking along the boundary will have the tool trying to find a path of selection that follows the area where the red and white colors meet. Clicking inside a closed set of anchors will convert the anchor and path area into a selection. This tool can have some rough results depending on the image you're working on, but it also has some useful aspects.
The options include the usual aliasing and feather check boxes, plus one other called 'Show interactive boundary'. This option allows the anchors created during the clicking to later be dragged to new positions, which can help refine the quality of the path between the anchors.
My experience with this tool is mixed. It can be useful for making quick selections of features that are clearly defined in the image. But sometimes it can become confused trying to find a clean path. Using the 'Show active boundary' option is a help to clean up the results, but be careful not to accidentally click inside the path shape while trying to edit the anchors, as this will convert the anchors to a selection and destroy the paths and anchors!
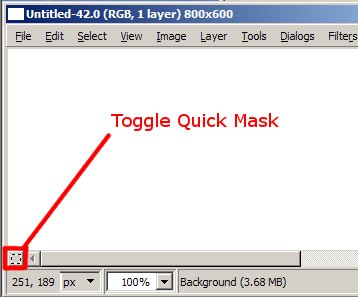
Quick Mask Mode
Quick mask is a special mode where you can paint with brushes to create the desired selection areas. The button to enable quick mask mode is shown below, and note that this button will only be visible if you have scrollbars set to show.
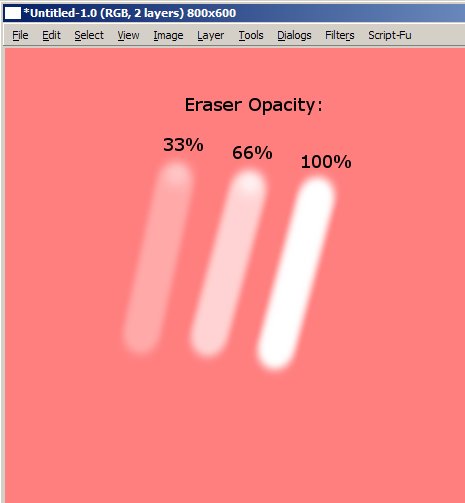
When you click the quick mask mode button (or use the keyboard hotkey Shift+Q), the image area will initially be covered by a red colored overlay. This overlay color indicates the areas which are not yet selected. You can use the eraser tool with any brush type you choose to 'erase' this red overlay, creating areas of selection. It's important to note that this mode supports creating partially transparent selections. This is illustrated in the image below, where I've made three marks at different transparencies by adjusting the eraser tool's opacity slider.
This is a very useful tool for skinners when it comes to creating alpha maps for sims like FS2004, where different levels of transparency on the alpha layer will create different levels of reflectivity on the aircraft.
And it's important to note that you can also use the other types of selection tools while in quick mask mode, to help further refine your work. For example, you can switch to quick mask mode, then use the rectangle selection tool to select an area that needs to have a partial transparency. Then once you're rectangle marquee is placed, use your eraser tool at the desired level of opacity to erase inside the rectangular marquee. When you exit quick mask mode, you will have a single full layer of selection, with varying levels of transparency.
Channels
In GIMP, the channels window contains two types of information. In the upper portion of the window you'll see three or four layers depending on your image. These are the main color and alpha channels for the image, with one color layer for red, green, and blue, plus the fourth layer which contains image transparency data. Each of these channel layers is grayscale, representing a range from 0 to 255 (8 bits of data)for each channel. The color layers are additive, so that their values are added together to achieve the full 16 million colors that can make up an image (3 x 8 bit color channel layers totaling 24 bits).
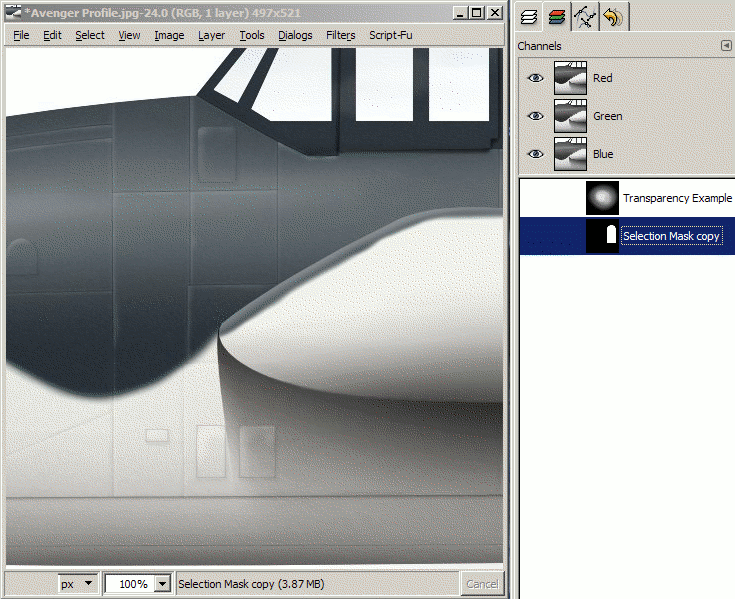
The second part of the channels window contains selection masks, which are also saved in a layer stack all their own. A selection mask is essentially a saved version of a selection that you have made in your image. We'll look at how these can be created, edited, and used to create selections.
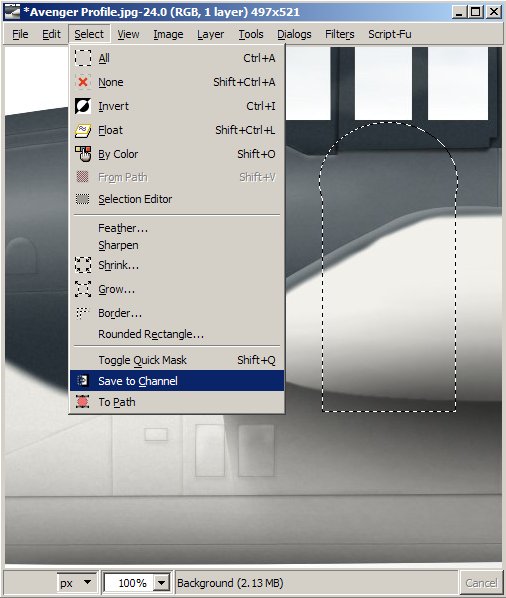
This first thing to establish is how we convert a selection into a channel. In the example image below I've created a selection shape, and then using the menu shown, I choose 'Save to Channel', which will create a new channel in the channels stack, and that channel will contain a mask that matches my selection area.
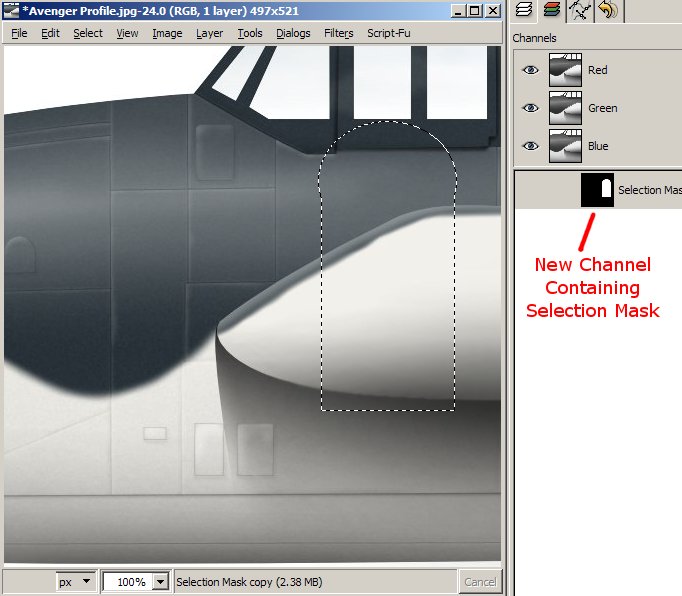
In this image you can see the new layer channel is created and matches my selection area.
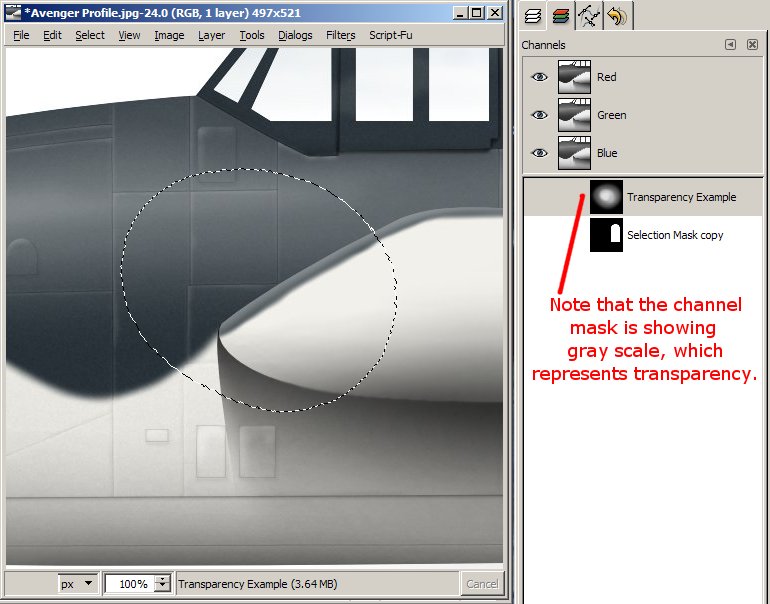
It's important to note that these channel selection layers can also contain transparent selections. We can see this by creating a selection with transparency, saving it to a channel, and then previewing the results in the channel layer stack preview.
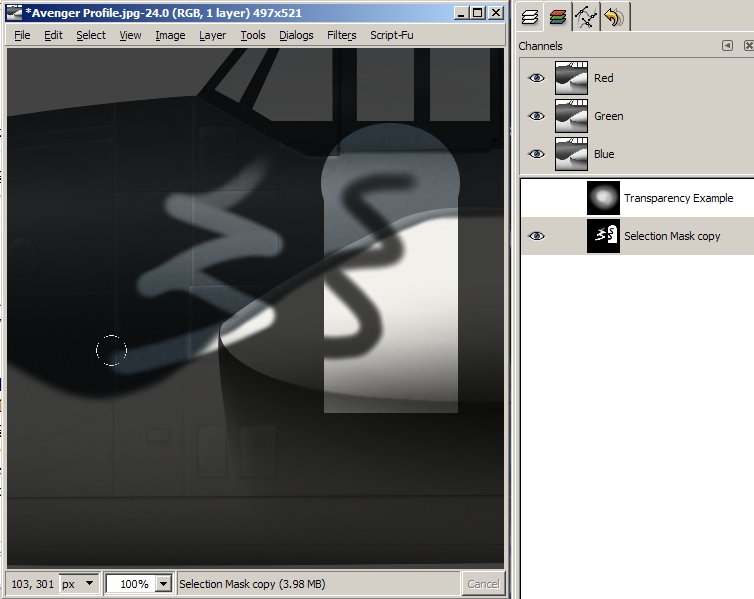
Now lets look at how we can edit a channel layer that contains a selection we've created. The first thing to do is enable the visibility for that channel layer, so we can see it's full effect on our image. Do this by clicking on the 'eye' icon that controls layer visibility, just the same as if this was a normal layer in the image. You should see something like this:
Enabling the visibility of a channel layer will add a mask over the artwork as shown in the animation above, so that you can judge where the channel layer selection is located.
Once we've got the channel layer visible, we can edit this layer as though it were an ordinary image layer using the brush and eraser tools. Do be aware that since this is an 8 bit channel layer, all edits will be made in grayscale. You can use any of the selection methods mentioned previously while editing. You'll see the results of your editing represented in both the channel layer icon, as well as on the channel overlay mask which is over the main image work area.
In this example, I've used the brush and eraser to make some edits to my channel, and we can see the results in the overlay and in the layer preview. The soft feather on my brushes is retained in the channel layer, and will also be present if this layer is applied as a selection.
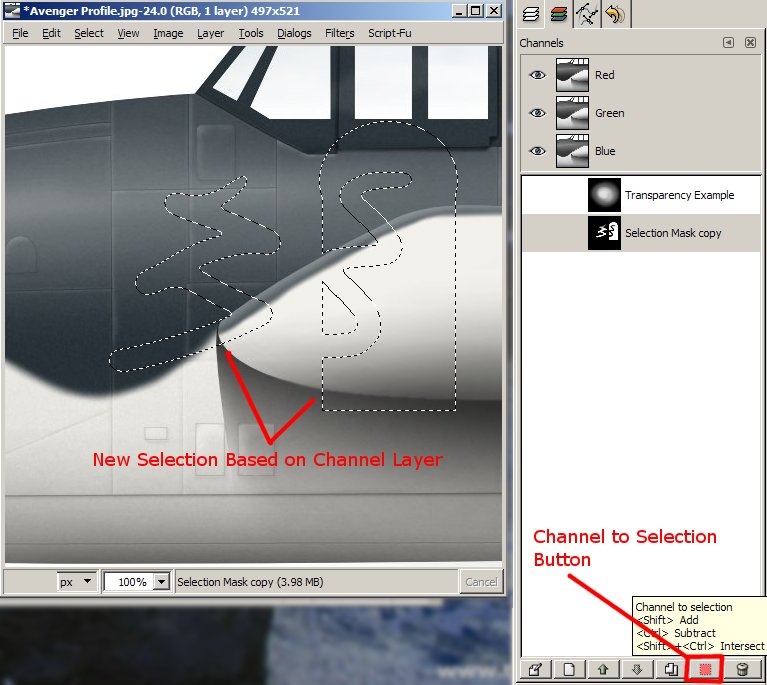
Creating a Selection from a Channel
Once you've got a channel layer saved and edited, it's then possible to use that channel layer to create selections in the main image. In the image below, I've turned off the channel layer visibility to hide the overlay. Then I've clicked the icon in the bottom of the channel layer window which allows me to add a selection to my image based on the active channel layer.
Advantages of Paths, Selection, and Channels for Skin and Profile Artists
In this article I hope to show you how you can use each of the covered tools to help in making selections which are each specially suited to different situations. With the most basic selection tools, it's possible to quickly make some selections, edit in them, and move on. Using paths, it's possible to create repeatable selections which are very carefully shaped in situations where curves are needed, and we don't want to freehand them. Channels combine the value of the basic selection, quick mask, and paths tools, but adds the ability to refine the selection with precise feathering with custom brushes.
By examining the type of selection you are needing to create, and applying the knowledge gained here, you can more quickly and easily use a technique that is closely suited to the situation at hand.
-adlabs6
Last edited by Serval; 18th November 2015 at 14:59.
Junior Member
 Posting Permissions

