Results 1 to 5 of 5
  1. #1
    Join Date
    Feb 2007
    Posts
    3
    Downloads
    0
    Uploads
    0

    Shy Proper Technique for painting the German Moray effect

    Good afternoon all,

    Using Photoshop 6. However, I just need to learn a good technique, so Im sure any program used would be about the same.

    I have skinned (panel lines and rivets) a 262 using Osprey and Squadron Signal resources for AH2 and have to admit..damn it looks good With exception of a few stretches on the model that I worked around I am quite happy with it. My problem lies with painting the skin itself. I have used every technique of blurring, opacity changes, burn, dodge, overlay, ect. I still have yet to paint what I feel is "accurate" to a proper German Moray effect (well, thats what I call it.) Where the paint scheme will fade from a very dark base color at top to a fadeing out "mottel?" at the bottom 3rd of the fuselage, just above the wing structure.

    Anyway. I have seen perfect examples of models painted in this forum and was wanting to know if someone could possibly write a tutorial on the proper technique, or could give a brief explanation in this thread. I have looked throughout the website and have found nothing on the subject.

    The target outcome is to reproduce a skin in the paint-scheme of White 8 of Kommando Nowotny.

    Help me Obi-wan's. Ur my only hope.

    ReDhAwK
  2. #2

    Re: Proper Technique for painting the German Moray effect

    I think I know what you mean.
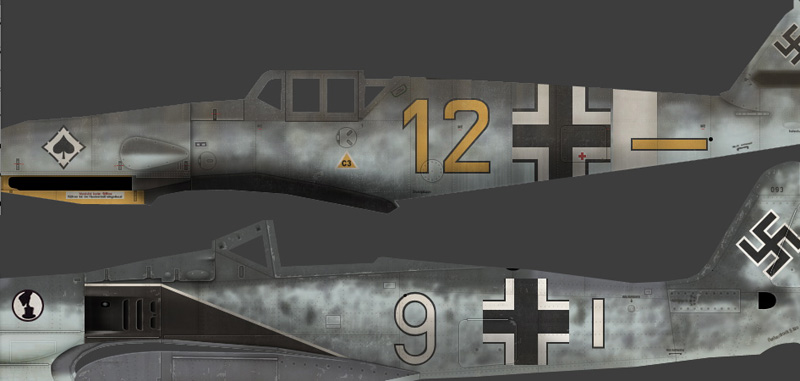
    This?
    Name:  camo.jpg
Views: 311
Size:  90.8 KB
    If you're looking for some sort of filter or "Jedi" trick to produce this effect easily, I think you're out of luck. Plus, I can't think of anything more offensive to my senses than a quick filter to produce the German mottle effect
    To start, think of how they are painted. They are all individually done, the side camouflage I mean. Each one is different from another. They were painted with a spray gun at random, no masks. Most all painting applications have an airbrush setting. With the proper size soft brush, this effect is easy to get. I do mine with a light opacity and build them up slowly to achieve the softness seen on many of the planes... although some of the mottling can be very blatant. I think Ebola does mottling very well. Plus, there are MANY guys here how specialize in German camouflage and do it expertly! They probably all have tricks to how it's done.
    For me, there is no other way but to gather good photo reference of the plane you want to reproduce and bit the bullet! Start painting them on by hand, one at a time, no masks. Keep experimenting with different brushes, opacities and other techniques until you get something that is representative.
    That's what I do at least

    (oh, I suppose you could set the "jitter" on a irregular shaped brush if you wanted a "generic" effect and didn't care to match a photograph.)

    FAST AND BULBOUS!
  3. #3
    Join Date
    Feb 2007
    Posts
    3
    Downloads
    0
    Uploads
    0

    Re: Proper Technique for painting the German Moray effect

    Heya Blowhard. That is the exact effect I was talking about. I was sure there was no filter to use as I have been trying to build them with my airbrush as well. However, my effect seems to brash (read as defined) rather than the smooth transitions your examples show. Especially where your examples show the transition from dark to transparent effect.

    Too much time involved in the development of this skin to put a "shoddy" paint scheme on it. I seem to have the most difficulty with German skins so am wanting to apply myself to making the best representation of them that I can I hope this to be the first of many German aircraft I skin.

    I knew this was the place to come to I appreciate your post sir.

    ReDhAwK
  4. #4
    Join Date
    Aug 2005
    Location
    Elko Nevada
    Posts
    177
    Downloads
    0
    Uploads
    0

    Re: Proper Technique for painting the German Moray effect

    Red I use PSP 7 thu 11, Blow hard is correct, they were all painted by hand with a spray gun, so no two planes are exactly alike.
    Just use your spray gun and adjust the opacity , hardness, and step to get the desired effect your seeking.
    Once you have your spray gun dialed in, all you need to do is make yourself sa separate layer for the motling and have at it, if the edges are too hard, then use the softning brish to smooth the outter edges of your splot's a little.
    Should be alot of fun for you.

    Charlie
    Charlie Michael
    AKA_Snake
    Elko Nevada
    SPD Retired
    SILVRBAK82@AOL.COM
  5. #5
    Join Date
    Feb 2007
    Posts
    3
    Downloads
    0
    Uploads
    0

    Re: Proper Technique for painting the German Moray effect

    I appreciate it Snake. I look forward to being able to post something decent for you folks to look at

    ReDhAwK

Similar Threads

  1. Replies: 4
    Last Post: 25th June 2008, 14:08
  2. Rivets with rippled effect
    By Kamikuza in forum General Tutorials
    Replies: 2
    Last Post: 20th April 2008, 17:04
  3. My first Painting
    By bolz3r in forum IL-2 Series: FB / PF / 1946
    Replies: 4
    Last Post: 2nd January 2007, 18:09
  4. Painting CFS3 skins?
    By Bulls_i_ in forum General Discussion
    Replies: 1
    Last Post: 17th December 2005, 19:57
  5. German Spit...
    By Erretje_1.JaVA in forum IL-2 Series: FB / PF / 1946
    Replies: 3
    Last Post: 6th December 2005, 22:50

Posting Permissions

  • You may not post new threads
  • You may not post replies
  • You may not post attachments
  • You may not edit your posts
  •