The system of layers in Photoshop is particularly useful for the realization of news skins. It makes it possible to make the various elements composing a skin (camouflages, markings, stains etc) in different layers and to work them individually.
Creating a layer
By default when you start a new document (Ctrl+N) only the layer "background" is present.
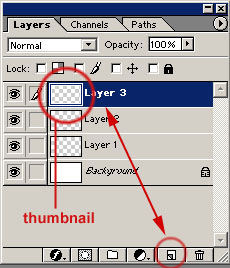
To add new layers it is enough to click on the icon "create a new layer" located at the bottom of the window showing the layers. The new layers come on top of the "background".
Athumbnail of the contents of each layer appears left of the name of the layer. Tip: If the window "Layers" is not visible click on "Show Layers" in the menu "Window".
Giving the layer a name
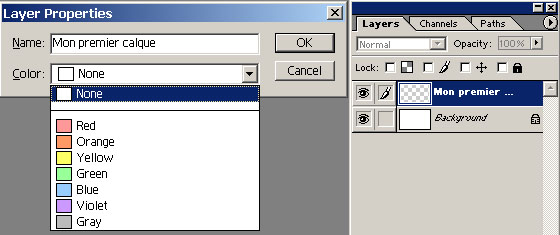
Click on a layer to make it active (a brush appears on the left), the background changes color indicating that it is selected, now right click on the layer. A menu appears, choose "Layer Properties".
In addition to the name, you can also choose the identification color of the layer.
Enabling and Disabling a layer
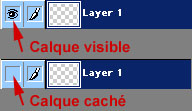
To make a layer visible or invisible click on the icon in the shape of eye located on the left of the layer you want to toggle.
Moving a layer
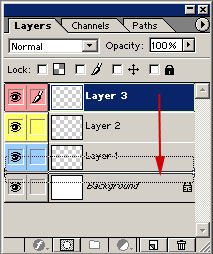
Because the paintwork on the top most layer(s) can cover the work of the layers beneath it, you might want to switch locations of the layers.
Click on the layer with the left button hold the mousebutton while you drag the layer to it's ne location.
You can also move a layer up and down using the Ctrl-[ and Ctrl-] keys combinations. Note: The "Background"-layer cannot be moved.
Duplicating and deleting layers
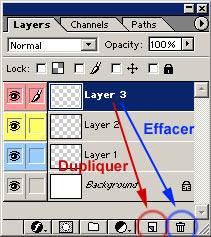
To duplicate a layer click on the layer and hold the mousebutton while dragging it to the "create a new layer" button at the bottom of the layers window.
To delete a layer click on the layer and hold the mousebutton while dragging it to the "delete layer" button at the bottom of the layers window. You can also access these function by rightclicking on the layer. Clicking on the "delete layer' button will delete the layer that is currently selected.
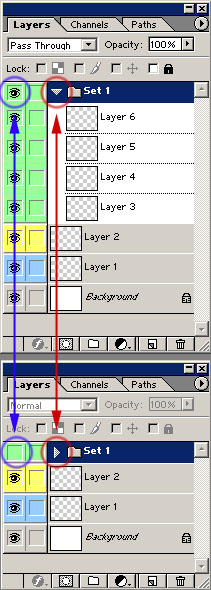
Creating a layerset
Click on the button "Create new set" at the bottom of the layers window, modify the name and color by right clicking and selecting "layer set properties" from the menu that appears.
Now you can drag the layers to the set. The layers that belong to a set show up idented.
By clicking on the eye next to the set yu toggle all layers that belong to the set visible or invisible at once. By clicking on the arrow next to the set you open or close the set. This will show or hide the layers that belong to the set from the layer window. This way you can keep the list orderly and clean.
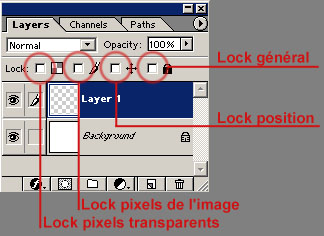
Locking options
Each layer can be locked in various ways. Below yu find the four locking options from left to right.
- Checking the most left checkbox locks the transparency of the layer
- By checking the second checkbox you protect the layer from being painted on.
- By checking the third checkbox from the left, you disable functions that let you move the objects painted on this layer
- The last checkbox locks the layer completely. You cannot change anything to this layer.
When a layer is locked, you will see a small icon of a lock next to the layer.
Opacity of a layer
The option "opacity" makes it possible to regulate the general level of transparency of a layer without modifying its contents: 100% the layer is "opaque", 0% the layer is completely transparent.
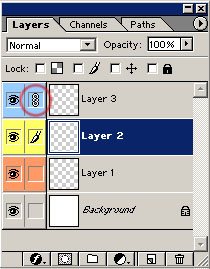
Linking layers
You can link a layer to the active layer by clicking on the empty box right of the eye-icon. A chain-icon appears then. This makes it possible to move the contents of both layers simultaneously.
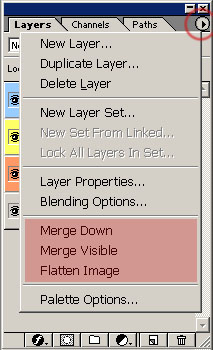
Merging layers and fattening the image
It is possible to merge layers. To do this, click on the arrow in top on the right of the Layers window.
Several options are available:
- Merge Down, makes it possible to merge the active layers with the layer directly below it,
- Merge Linked (Merge Down is replaced with this when the active layer is related to other layers), allows to merge all the layers that are linked with the active layer,
- Visible Merge, merges all the visible layers,
- Flatten Image, merges all layers with the "background".

 Bug creator

 Posting Permissions


 Reply With Quote