


 Reply With Quote
Nice Picture Tutorial, A picture says a thousand words .
Charlie

 Junior Member

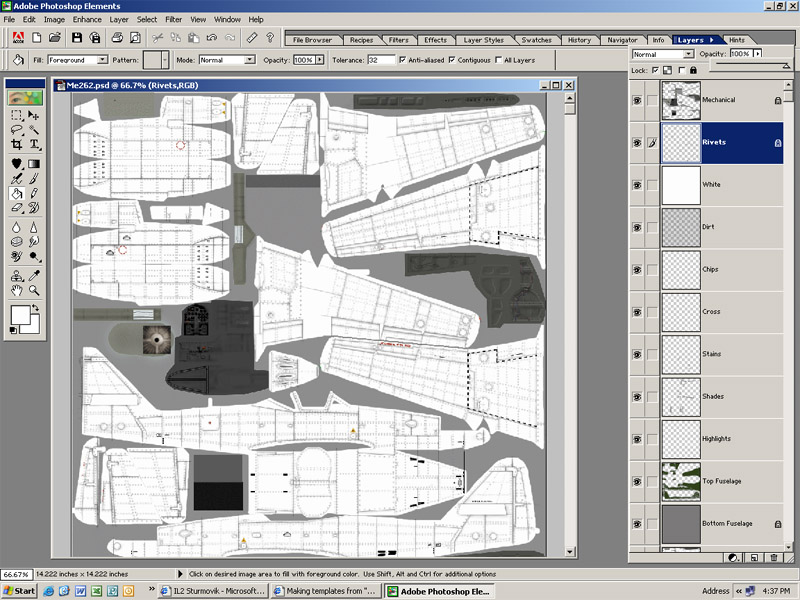
When you select the void file layer, it is an opaque white with black panel lines, rivets & mechanical features as well as some shading.
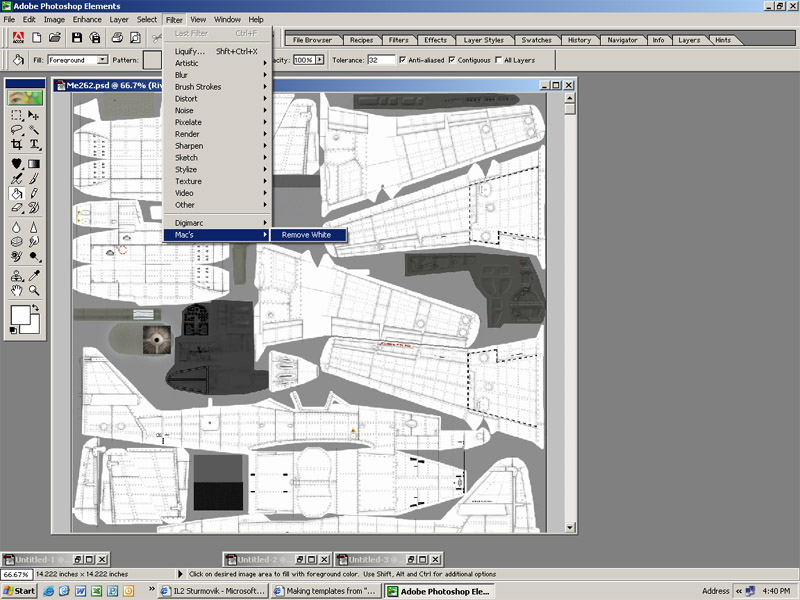
If you have remove white in your plug-ins folder, you simply double click the selection for remove white in the dropdown and it deletes the white portions of the selected layer. This leaves you with a layer of only rivets & lines. You can then reduce the opacity to make the lines "fade" so they look correct. Black rivets on a light gray background would look a little odd. Dark gray on the other hand looks better.
The reason you need a second layer taken from the void with rivets & panel lines erased is so you can leave it on top at 100% opacity for wheels, cockpit, etc but reduce the darkness of the rivets seperately.
Here is a visual....
You have the void as your 2nd layer (renamed rivets);
You select it and run remove white from your plug-ins;
You now have a transparent void file at 100% opacity and you can see the background colors beneath it;
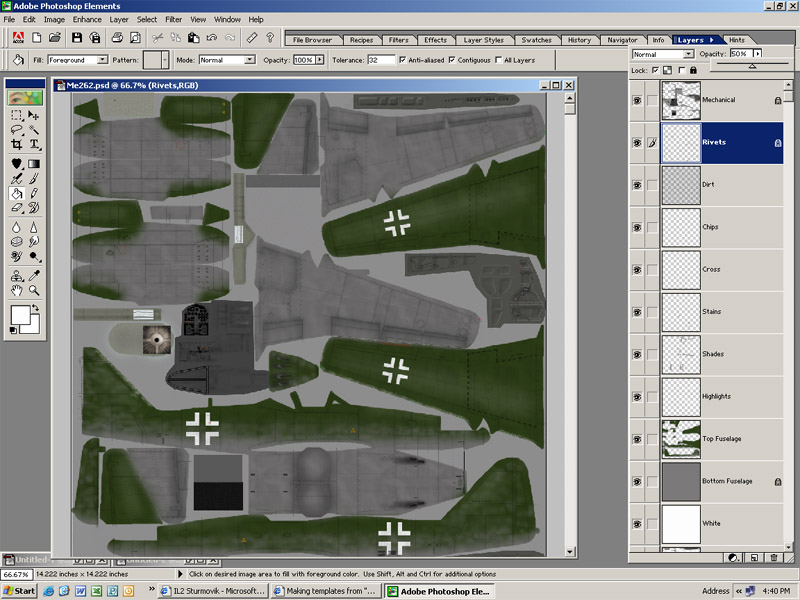
Then you reduce the opacity to fade the rivets until they look natural. In this case, about 50%. Usually it is more like 75%.
The better the void file is done, the less you have to mess with it. On the Gladiator/J8A, you can leave it at 100%. The Me262 here had filler over the rivets & seams so they should be almost invisible. Depends on the plane.
Last edited by Serval; 18th November 2015 at 15:36.
Senior Member
Nice Picture Tutorial, A picture says a thousand words .
Charlie
Junior Member
Sometimes it occurs that a skin made from void file when tranformed back into indexed and then saved to bmp file is not recognized by IL2. Is there anything one can do?
Forum Guy
First things I'd check are the resolution and filesize of the skin that won't load. Always 1024x1024 (512x512 for the original IL2) and If I recall correctly 1MB filesize.
Check that out, if they match post back and I'll we'll take another look.
Junior Member
Im new to this site and have noticed that you guys are using an earlier version of Photoshop. I have Photoshop CS2 and when I open a "Void" paint scheme (or any paint scheme for that matter) it opens it up and makes it into an "Index" instead of a layer. If you have any idea of how to convert an Index into a layer please let me know. Thanks ^_^
Grand Wazoo
Index? I've used CS, CS2 and CS3, I've never heard of this. All CS Photoshops handle layers the same way AFAIK.
You have your layers menu open and there is nothing in it except for the background layer?
Where is the "index" thing and what is it? The only index I know in Photoshop is a color mode, Indexed Color. Open one of your files that you get the index thing in, go to the Image menu, select the Mode sub menu and if the mode is Indexed Color, change it to RGB. See if that works.
FAST AND BULBOUS!
Forum Guy
I think that's right Blowhard. Earlier when I first read this, I couldn't double check in Photoshop, but yes changing Indexed Color to RGB is the answer. From there Drako, you'll always keep your layered template in RGB mode. Only the final saved BMP file will get converted back to Indexed Color.
Grand Wazoo
Isn't there a file handling tutorial here or somewhere for IL2, CFS etc? This one is game specific, one of those things you need to know about the particular game you are working within and the file format. Each file type will have it's own protocols.
FAST AND BULBOUS!
Forum Guy
Yes Blowhard, the tutorial at this link is centered on IL2, and the converting to RGB is included there:
http://www.simmerspaintshop.com/foru...read.php?t=464
Last edited by Serval; 18th November 2015 at 15:38.
Bug creator

Well it is sim specific, but at the other hand about understanding color depth.
This is a nice tutorial as well: http://www.simmerspaintshop.com/foru...read.php?t=832
Last edited by Serval; 18th November 2015 at 15:39.
 Posting Permissions


