
-
1st October 2012, 06:58
#1
The Plastic Canvas
For a while I've wanted to look at some model railroad stuff, but I don't want a model railroad. More the detailing, painting, and weathering aspects.
There aren't many static display locomotive kits out there, and buying an undecorated HO powered (or even unpowered model) can cost $75 or more. So I went into storage and got out an old Bachmann I've had since the early 1990s, maybe the late 1980s. My brother and I ran this on a pretty nice layout back then.
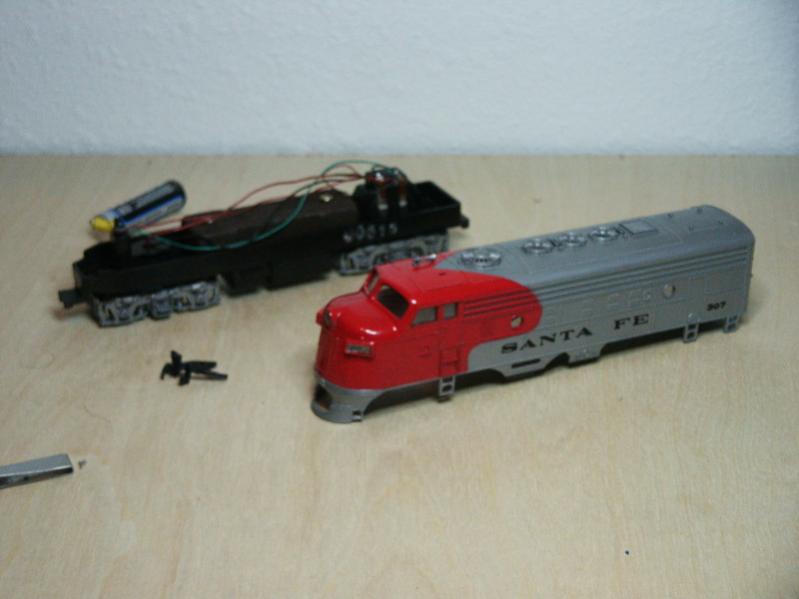
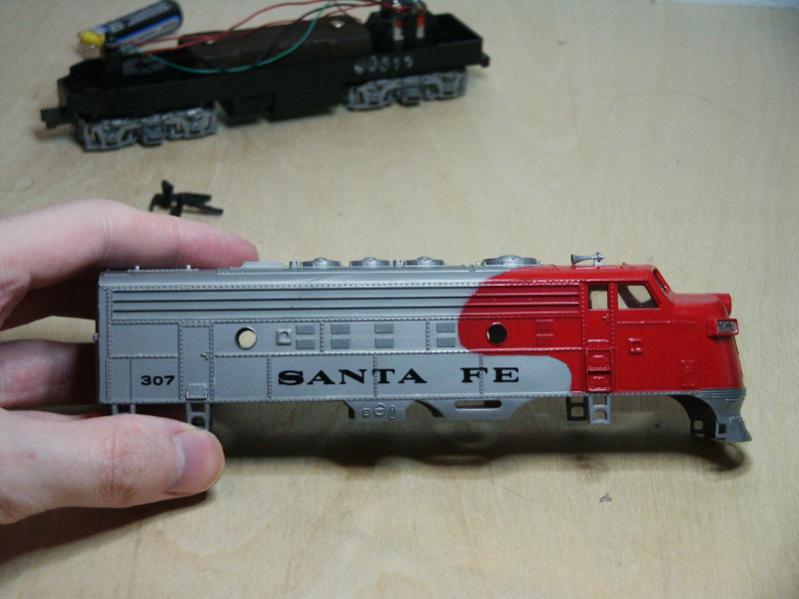
This model appears to be an EMD F9 A unit. That's what I'll rebuild it as, in any case. Looking at some reference photos, there were numerous shortcomings in the molding. I've been busy stripping off the old paint (thick and tough as nails!) and cutting away on the body shell. I'm ordering some Milliput to rework a few areas.
Tomorrow I'll take a photo of it's current state. Oh, the ultimate refinish will probably be a D&RGW, like this:
Zephyr Time! | Flickr - Photo Sharing!
-
1st October 2012, 16:22
#2
Re: The Plastic Canvas
FUN! You're right, rail road models are EXPENSIVE! That's a nice scheme you picked too 
 FAST AND BULBOUS!
-
2nd October 2012, 00:45
#3
Re: The Plastic Canvas
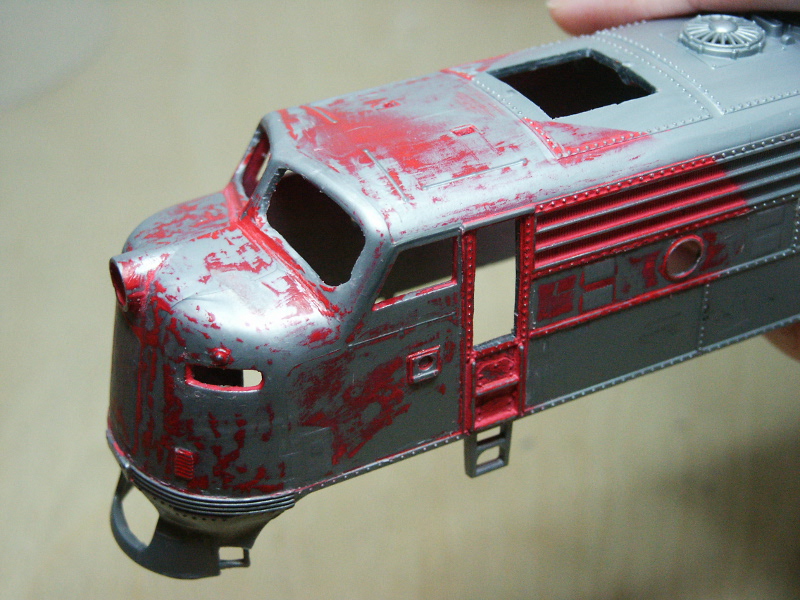
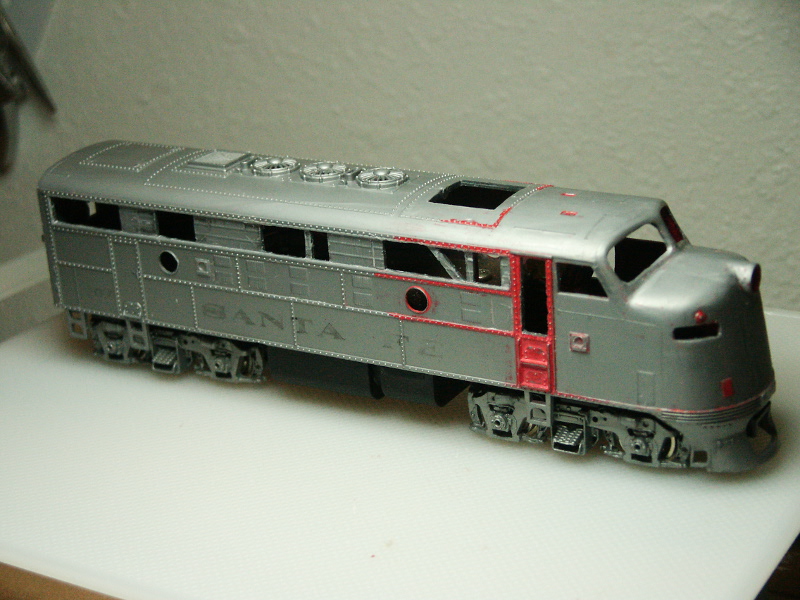
Pics of the prep work.
The factory paint appears to have been sprayed on, and was thick like a candy shell. About 5 sessions of paint thinner and some 70% alcohol, and still some scraping to get to this point.
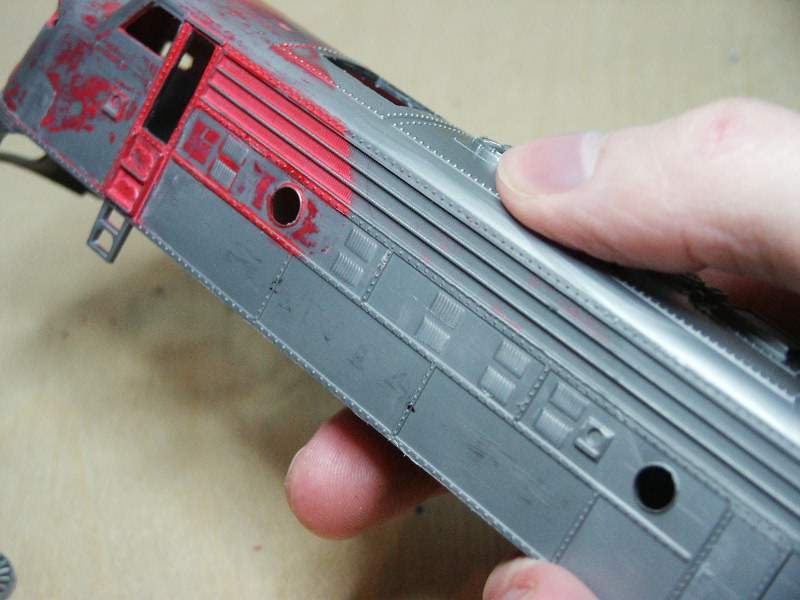
Several parts of the molding will need replacement. Most of them have been cut away already:
-Side fuel tank skirts, cut away. Correct parts will be created from scratch.
-Cab doors cut away, opening doors will be created.
-Large 48" fan on the roof cut out. Reference photos show this fan should be sitting on a flat surface that drops below the level of the roof arc. I cut out the area for the flat panel using a heated blade. The fan molding was saved to be reintegrated on the new parts.
-Molded hand rails all scraped off. These will be replaced with shaped wire.
-Side vents have been scraped flat with the body. I don't think these should stick out, but be flush. Secondly, the front two sets (flanking the window) are molded too far from the window. I'm going to try to correct that with the replacements.
-Side porthole windows had thick edges, so I thinned the plastic with a rotary tool.
Beyond that, just scraping edges of the body and wheel trucks to remove all the flashing. I've also gone over a lot of the scraped off areas, and the nose, with 1000 grit sand paper.
Also still to do, the rear door is going to need some fixes. I need to get a good photo source, first.
-
2nd October 2012, 03:59
#4
-
2nd October 2012, 07:52
#5
Re: The Plastic Canvas
Yes indeed. Tonight I've put an hour into being a bit more adventurous with the scraping. Results are looking pretty good. Another session or two, and then some sanding should take it most of the way.
I have no idea how I'm going to get the paint out of the side grilles. Three times I filled the troughs with thinner and let it soak, scrubbed, and little effect.
One option is to cut those grilles out, model the structure beneath, and then put some new grilles over top.
-
3rd October 2012, 03:48
#6
Re: The Plastic Canvas
Most of the paint is gone off the nose now. My scraping doesn't appear to have done any harm. I finished it off with a wet sand at 1000 grit. The biggest remaining problem will be the tricky pads of paint between the rivets.
As for the side air grilles, I cut the molding down flat. Then carved out the openings between the substructure elements. This means either building the replacement grilles or buying a pair. We'll see. They'll be nearly last to install, I would guess.
That square vent aft of the rear most cooling fan is going to present a problem for my chosen subject. It will need to be changed into a fan to match the other three.
-
3rd October 2012, 16:33
#7
Re: The Plastic Canvas
FAST AND BULBOUS!
-
4th October 2012, 17:47
#8
Re: The Plastic Canvas
This is very interesting Adlabs, I'm looking forward to seeing this project progress.
Have you ever thought of doing it the easy way by repainting an F7 in Train Simulator 2013
I found some very nice images of very worn F7A units when doing some research, helping to haul freight trains hooked up to several more modern Locos.
Last edited by briyeo; 4th October 2012 at 17:59.
-
4th October 2012, 21:44
#9
Re: The Plastic Canvas
Gonna be following this thread, Slammer loves the American Diesel locomotives.
I did this one in Illustrator a bit back and it was used for quite some time to demonstrate large format silk-screen printing.
http://i27.photobucket.com/albums/c1...lokomotive.jpg
-
4th October 2012, 22:07
#10
Re: The Plastic Canvas
There are some very nice schemes for these locos, I was attracted to the Louisville and Nashville Railroad scheme. I don't know much about US railroads it just appealed to me.
At least you wont have problems with the mapping that I had on my unfinished repaint attempt
http://img.photobucket.com/albums/v30/briyeo/LandL.jpg
 Posting Permissions
- You may not post new threads
- You may not post replies
- You may not post attachments
- You may not edit your posts
-
Forum Rules


 Reply With Quote
 Forum Guy

It's a LOT of work! I know first hand


